I love Chinese food; I could go to a Chinese restaurant for days and never order the same thing twice. One dish I enjoy is Sweet and Sour, but I always have trouble deciding between chicken, pork or shrimp; so I end up ordering the combination. It's like getting a little surprise in every bite; ok, after a while you can tell what is what, but it's still fun to pretend.
Preparing for Thanksgiving entails a lot of work; cleaning the house from top to bottom, doing the shopping for groceries, baking the pies, and a few odds and ends. Roy's mom and brother come up from Moab to eat with us, so I want everything as perfect as humanly possible.
So what in the world does Chinese food have to do with Thanksgiving Day? I get worn out, so to spoil me, Roy decided to make dinner and he made me Sweet and Sour Chicken with Fried Rice. All I had to do was sit on the kitchen stool and supervise, but he did all the work; and he did a damned great job!!! So for those of you busting a gut trying to get heaven and earth organized for Thanksgiving; step back and let a loved one cook a meal for you as their way of giving you thanks for being so wonderful.
Sweet and Sour – Chicken, Pork or Shrimp
Ingredients:
¼ cup canola or peanut oil
1 cup each chopped red and green bell peppers, onions and drained pineapple chucks
2 cups flour
2 Tbsp canola oil
2 Tbsp cornstarch
1 tsp salt
½ tsp ground white pepper
1 egg
1 ¼ to 1 ½ cups of water
2 lbs of boneless, skinless chicken breasts or pork tenderloin, cut into 1 inch cubes; or medium sized shrimp, peeled and deveined; or a combination equally up to 2 lbs.
1 qt of canola or peanut oil for frying
2 cups homemade sweet and sour sauce; kept warm.
Preparation:
In a large skillet or Wok, heat oil on medium-high heat; sauté peppers, onion and pineapple until the edges just begin to caramelize. Remove from oil and set aside.
In a large bowl, combine flour, 2 Tbsp oil, cornstarch, salt, white pepper and egg; gradually add water until a thick batter forms. Add chicken, pork, shrimp or combination into batter making sure to thoroughly coat each piece. Heat the 1 qt of oil in the skillet or Wok over medium-high heat; when temperature reaches 360F, drop several pieces of battered pieces into the oil, but do not overcrowd. Pieces will be done when they are golden brown and float to top of oil; remove to paper towels to drain. Repeat until all battered pieces are done.
Combine sautéed vegetables and pineapple with battered pieces and warm sauce; serve over white, brown or fried rice.
Makes 8 servings.
Mary Cokenour
and should be enjoyed everyday.
Utah, Colorado, New Mexico and Arizona.
Monday, November 21, 2011
Give Thanks to Those Cooking your Thanksgiving Meal.
Labels:
chicken,
Chinese,
food blog,
food porn,
Fried Rice,
Mary Cokenour,
pork,
recipes,
shrimp,
sweet and sour sauce,
Wok
Saturday, November 19, 2011
Sorry Campbell's, My Recipe is Better.
The other day a link to a recipe popped up on Facebook and it referred to a recipe called "Angel Chicken". Basically it was a crock pot recipe where Campbell's Golden Mushroom soup, a packet of Italian salad dressing mix, cream cheese and white wine cooked for about 4-5 hours and was then served over angel hair pasta. Simple recipe and I was willing to give it a try, that is until I went grocery shopping. At City Market, a Kroger store, they had 2 cans of the condensed soup for $3...that's $1.50 per can if you had a shopper's card. Otherwise it was $1.79 per can...seriously, almost $2 for a 10.5 ounce can of condensed soup? I don't think so!
I went home, got online and looked up the ingredient list for the soup; salt and sugar were the first two ingredients and the listing of preservatives and chemical additives was longer than the natural ingredients. I broke down the basic ingredients to beef broth which already has salt in it, tomato sauce, white wine, a roux of butter and flour, water and mushrooms. Finding 8 oz packets of sliced mushrooms on sale for 2 for $3 and having the other ingredients at home; I was off to make my own golden mushroom soup. But wait you're now saying, the price for the mushrooms was the same as if I'd just bought the 2 cans of soup. I know, but the idea of deconstructing the processed soup and then recreating from scratch was a much better prospect than convenience.
As the cooking process of the soup commenced, the smell in the kitchen was heavenly; if the entire recipe tasted as good as it smelled, this would be one heck of an accomplishment. Now unknowingly, I had run out of angel hair pasta, so served the chicken, mushrooms and sauce over linguine instead...it was amazing; simply amazing. More work than opening a little can of soup...oh yes, but so, so worth all the effort.
So sorry Campbell's, but mine is better.
Golden Mushroom Chicken
Ingredients:
8 Tbsp butter
8 Tbsp flour
1 (8 oz) package, cut into cubes and softened
1 (14.5 oz) can beef broth plus ½ can water
¼ cup white wine
1 (8 oz) can tomato sauce
½ tsp garlic powder
1 tsp each crushed, dried basil, thyme and marjoram
¼ tsp ground black pepper
8 boneless, skinless chicken breast halves, trimmed of fat
1 lbs sliced white mushrooms
1 ½ lbs angel hair pasta
Preparation:
In a large saucepan, medium-high heat, melt butter and whisk in flour; add cream cheese and stir until cream cheese begins to combine with the roux. Add beef broth, water, wine, tomato sauce, garlic powder, herbs and black pepper. Bring to a boil and reduce heat to low; let simmer for 5 minutes.
Set 6 qt crock pot on low; place in chicken breasts, mushrooms on top of chicken; pour the sauce over all. Cover and let cook for 5-6 hours; until chicken is moist and tender.
Prepare pasta according to package directions; place a chicken breast on top a serving of pasta and spoon sauce over all.
Makes 8 servings.
Mary Cokenour
I went home, got online and looked up the ingredient list for the soup; salt and sugar were the first two ingredients and the listing of preservatives and chemical additives was longer than the natural ingredients. I broke down the basic ingredients to beef broth which already has salt in it, tomato sauce, white wine, a roux of butter and flour, water and mushrooms. Finding 8 oz packets of sliced mushrooms on sale for 2 for $3 and having the other ingredients at home; I was off to make my own golden mushroom soup. But wait you're now saying, the price for the mushrooms was the same as if I'd just bought the 2 cans of soup. I know, but the idea of deconstructing the processed soup and then recreating from scratch was a much better prospect than convenience.
As the cooking process of the soup commenced, the smell in the kitchen was heavenly; if the entire recipe tasted as good as it smelled, this would be one heck of an accomplishment. Now unknowingly, I had run out of angel hair pasta, so served the chicken, mushrooms and sauce over linguine instead...it was amazing; simply amazing. More work than opening a little can of soup...oh yes, but so, so worth all the effort.
So sorry Campbell's, but mine is better.
Golden Mushroom Chicken
Ingredients:
8 Tbsp butter
8 Tbsp flour
1 (8 oz) package, cut into cubes and softened
1 (14.5 oz) can beef broth plus ½ can water
¼ cup white wine
1 (8 oz) can tomato sauce
½ tsp garlic powder
1 tsp each crushed, dried basil, thyme and marjoram
¼ tsp ground black pepper
8 boneless, skinless chicken breast halves, trimmed of fat
1 lbs sliced white mushrooms
1 ½ lbs angel hair pasta
Preparation:
In a large saucepan, medium-high heat, melt butter and whisk in flour; add cream cheese and stir until cream cheese begins to combine with the roux. Add beef broth, water, wine, tomato sauce, garlic powder, herbs and black pepper. Bring to a boil and reduce heat to low; let simmer for 5 minutes.
Set 6 qt crock pot on low; place in chicken breasts, mushrooms on top of chicken; pour the sauce over all. Cover and let cook for 5-6 hours; until chicken is moist and tender.
Prepare pasta according to package directions; place a chicken breast on top a serving of pasta and spoon sauce over all.
Makes 8 servings.
Mary Cokenour
Labels:
angel hair pasta,
Campbell's,
chicken,
comfort food,
crockpot,
food blog,
food porn,
golden mushroom soup,
Mary Cokenour,
recipes
Thursday, November 17, 2011
Bring it to the Party!
Last weekend hubby and I were invited to a "Twilightathon" party at friends', Sean and Heidi, home. While not big fans of shiny vampires, the chance to get out and socialize with other adults was the real treat. Anyone attending was asked to bring a snack to share which is only fair and I had planned on making my Mexican 4-layer dip. Heidi though was hankering for a 7 layer dip and who was I to deny her? Now I'm not going to claim that 4 or 7 layer dip was originally started by me; there are just so many different versions out there, so I'm just posting my take on them.
Anyway, then I was thinking about this little snack treat that I've been dying to make, but it makes so many that it's only good for a party. Hello, did someone say party? I first had this treat way back in 1997 when a coworker brought them in for a Christmas party. They were great and the recipe, only 3 ingredients, was passed around to everyone. Now you can find it on the internet everywhere, so if anyone is declaring they were the inventor....well who really knows by now? Anyway, at Heidi and Sean's party, they went faster than the dip, that's for sure.
So here come the recipes and next time you need a party snack idea, you've got a couple of more recipes to choose from. Enjoy!
Mexican 4 or 7 Layer Dip
4 Layer Dip
Ingredients:
1 (8 oz) container French onion dip (Helleva Good is the best)
1 (8 oz) jar medium, chunky style salsa
2 cups shredded lettuce
2 cups shredded Mexican cheese blend
Tortilla chips
Preparation:
Using a 12 inch round aluminum pizza pan, spread out the onion dip evenly out to the edges; next spread out the salsa over the dip. Evenly spread out the lettuce, then the cheese blend.
Serve with tortilla chips for dipping.
7 Layer Dip
Ingredients:
1 (14.5 oz) can refried beans
1 (8 oz) jar medium, chunky style salsa
2 cups shredded lettuce
1 (12 oz) bag shredded Mexican cheese blend
1 ½ cups sour cream
1 ½ cups guacamole
1 cup each sliced black olives and diced onions, mixed together
Tortilla chips
Preparation:
Using a glass or plastic 2 quart rectangular dish, evenly spread out each ingredient, in order, over the next. Refrigerate for an hour to let the layers settle together. Serve with tortilla chips.
Note: For either dip, using a spatula to spread ingredients allows for smoother, more even layers.
~~~~~~~~~~~~~~~~~~~~~~~~~~~~~~~~~~~~~~~~~~~~~~~~~~
3 Ingredient Pretzel Chocolate Snack
Ingredients:
1 (10 oz) bag square or round waffle pretzels
2 (13 oz) bags Hershey’s Kisses (any one type or a mixture), unwrapped
1 (14 oz) bag plain chocolate M&M’s
Preparation:
Preheat oven to 180F; line a jelly roll pan with parchment paper.
Spread pretzels onto parchment paper; place an unwrapped Hershey kiss in center of each pretzel. When all pretzels have a kiss on them, carefully place on center rack of oven, so they do not shift about.
Within 5 minutes the chocolate will get a glossy sheen to it; carefully remove pan from oven. Gently press an M&M candy in the center of each kiss; the chocolate will squash down and adhere to the pretzel.
Place pan in a cool place to let the chocolate firm up and set. The snacks can be stacked inside a plastic container; place a piece of waxed paper between each layer.
Makes about 75 - 100 pieces; dependent upon using whole pretzels only, not broken pieces.
Mary Cokenour
Anyway, then I was thinking about this little snack treat that I've been dying to make, but it makes so many that it's only good for a party. Hello, did someone say party? I first had this treat way back in 1997 when a coworker brought them in for a Christmas party. They were great and the recipe, only 3 ingredients, was passed around to everyone. Now you can find it on the internet everywhere, so if anyone is declaring they were the inventor....well who really knows by now? Anyway, at Heidi and Sean's party, they went faster than the dip, that's for sure.
So here come the recipes and next time you need a party snack idea, you've got a couple of more recipes to choose from. Enjoy!
Mexican 4 or 7 Layer Dip
4 Layer Dip
Ingredients:
1 (8 oz) container French onion dip (Helleva Good is the best)
1 (8 oz) jar medium, chunky style salsa
2 cups shredded lettuce
2 cups shredded Mexican cheese blend
Tortilla chips
Preparation:
Using a 12 inch round aluminum pizza pan, spread out the onion dip evenly out to the edges; next spread out the salsa over the dip. Evenly spread out the lettuce, then the cheese blend.
Serve with tortilla chips for dipping.
7 Layer Dip
Ingredients:
1 (14.5 oz) can refried beans
1 (8 oz) jar medium, chunky style salsa
2 cups shredded lettuce
1 (12 oz) bag shredded Mexican cheese blend
1 ½ cups sour cream
1 ½ cups guacamole
1 cup each sliced black olives and diced onions, mixed together
Tortilla chips
Preparation:
Using a glass or plastic 2 quart rectangular dish, evenly spread out each ingredient, in order, over the next. Refrigerate for an hour to let the layers settle together. Serve with tortilla chips.
Note: For either dip, using a spatula to spread ingredients allows for smoother, more even layers.
~~~~~~~~~~~~~~~~~~~~~~~~~~~~~~~~~~~~~~~~~~~~~~~~~~
3 Ingredient Pretzel Chocolate Snack
Ingredients:
1 (10 oz) bag square or round waffle pretzels
2 (13 oz) bags Hershey’s Kisses (any one type or a mixture), unwrapped
1 (14 oz) bag plain chocolate M&M’s
Preparation:
Preheat oven to 180F; line a jelly roll pan with parchment paper.
Spread pretzels onto parchment paper; place an unwrapped Hershey kiss in center of each pretzel. When all pretzels have a kiss on them, carefully place on center rack of oven, so they do not shift about.
Within 5 minutes the chocolate will get a glossy sheen to it; carefully remove pan from oven. Gently press an M&M candy in the center of each kiss; the chocolate will squash down and adhere to the pretzel.
Place pan in a cool place to let the chocolate firm up and set. The snacks can be stacked inside a plastic container; place a piece of waxed paper between each layer.
Makes about 75 - 100 pieces; dependent upon using whole pretzels only, not broken pieces.
Mary Cokenour
Labels:
food blog,
food porn,
Hersey kisses,
layer dip,
M M candies,
Mary Cokenour,
Mexican,
party,
pretzels,
recipes,
snacks,
such sweet dish
Tuesday, November 15, 2011
Pies Aren't Always Sweet.
When you hear the word pie, often times your mind thinks of something sweet such as fruit pies or perhaps a rich cream pie with a mile high meringue topping. Pies can be savory too containing some type of meat and vegetables like Shepherd's or Cottage Pie or even sausage with peppers and onions can make a great filling in a pie crust.
Now how about taking an American classic sandwich, such as the Cheeseburger, and making that into a pie? Yes, it can be done; just check out online recipe sites or basic American cookbooks such as those put out by "Taste of Home" magazine. Trying to come up with something new for dinner one night, I decided to try my own version of a cheeseburger pie. Roy and I discussed what we like on a typical cheeseburger; simple items like cheese, of course, lettuce, tomatoes, ketchup, mayonnaise, horseradish mustard, grilled onions and/or mushrooms. Now how to make this into a pie of some sort and have it be edible; however we both didn't like all the items on one burger, so needed to compromise.
The first attempt wasn't very successful, too bland and if reheated, it was worse. The filling was also too mushy, so the addition of a binder was needed. The second attempt came out much better by adding some leftover ingredients from an Italian meal I made, plus using eggs as a binder...sort of like you would with a quiche. I do intend to play more with this recipe eventually, so don't be surprised if you see an update at a later time.
Cheeseburger Pie
Ingredients:
2-9 inch, deep dish pie crusts (frozen in pans, refrigerated or homemade)
2 lbs lean ground beef
2 Tbsp Italian herbal mix
1 Tbsp minced garlic
1 medium onion, diced
1 (4 oz) can sliced mushrooms, drained
1 cup diced tomatoes
1 (8 oz) can tomato sauce
1 cup ricotta cheese
1 (12 oz) bag shredded sharp cheddar cheese, divided into thirds
3 eggs, beaten
½ tsp each salt and ground black pepper
1 can Pillsbury Grands biscuits
Preparation:
Preheat oven to 350F; if refrigerated or homemade crusts, place in 9 inch pans; place pie crusts in oven for 5 minutes to set dough.
In large skillet, medium-high heat, brown beef; add Italian herbal mix, garlic, onion and mushrooms halfway through browning. Drain excess grease.
In large bowl, mix together beef mixture with tomatoes, tomato sauce, ricotta, 2/3 of the cheddar cheese, eggs, salt and pepper; mix thoroughly. Divide between two pie pans. Divide 6 of the Grands biscuits to form 12 thinner biscuits; press the 1/3 of the remaining cheddar cheese onto one side of the halved biscuit dough. Place 6 on top of each pie (1 in center, 5 around), cheese side up; bake for 20 minutes; let rest for 5 minutes before serving.
Makes 2 pies; 6 servings in each.
Mary Cokenour
Now how about taking an American classic sandwich, such as the Cheeseburger, and making that into a pie? Yes, it can be done; just check out online recipe sites or basic American cookbooks such as those put out by "Taste of Home" magazine. Trying to come up with something new for dinner one night, I decided to try my own version of a cheeseburger pie. Roy and I discussed what we like on a typical cheeseburger; simple items like cheese, of course, lettuce, tomatoes, ketchup, mayonnaise, horseradish mustard, grilled onions and/or mushrooms. Now how to make this into a pie of some sort and have it be edible; however we both didn't like all the items on one burger, so needed to compromise.
The first attempt wasn't very successful, too bland and if reheated, it was worse. The filling was also too mushy, so the addition of a binder was needed. The second attempt came out much better by adding some leftover ingredients from an Italian meal I made, plus using eggs as a binder...sort of like you would with a quiche. I do intend to play more with this recipe eventually, so don't be surprised if you see an update at a later time.
Ingredients:
2-9 inch, deep dish pie crusts (frozen in pans, refrigerated or homemade)
2 lbs lean ground beef
2 Tbsp Italian herbal mix
1 Tbsp minced garlic
1 medium onion, diced
1 (4 oz) can sliced mushrooms, drained
1 cup diced tomatoes
1 (8 oz) can tomato sauce
1 cup ricotta cheese
1 (12 oz) bag shredded sharp cheddar cheese, divided into thirds
3 eggs, beaten
½ tsp each salt and ground black pepper
1 can Pillsbury Grands biscuits
Preparation:
Preheat oven to 350F; if refrigerated or homemade crusts, place in 9 inch pans; place pie crusts in oven for 5 minutes to set dough.
In large skillet, medium-high heat, brown beef; add Italian herbal mix, garlic, onion and mushrooms halfway through browning. Drain excess grease.
In large bowl, mix together beef mixture with tomatoes, tomato sauce, ricotta, 2/3 of the cheddar cheese, eggs, salt and pepper; mix thoroughly. Divide between two pie pans. Divide 6 of the Grands biscuits to form 12 thinner biscuits; press the 1/3 of the remaining cheddar cheese onto one side of the halved biscuit dough. Place 6 on top of each pie (1 in center, 5 around), cheese side up; bake for 20 minutes; let rest for 5 minutes before serving.
Makes 2 pies; 6 servings in each.
Mary Cokenour
Labels:
cheeseburger,
food blog,
food porn,
Grands Biscuits,
ground beef,
Mary Cokenour,
pie,
recipes,
savory,
vegetables
Monday, November 14, 2011
Golden Dragon Reigns over Farmington, New Mexico.
Golden Dragon
2324 E. Main Street
Farmington, NM, 87401
(505) 325-5100
Website: N/A
Located directly next to Fresh for Less on Farmington's Main Street is the Golden Dragon Chinese Restaurant. This restaurant is open seven days a week and offers lunch and dinner buffets besides the regular ala carte menu. While it boasts the typical Oriental art upon its walls, the restaurant is open and welcoming, as is the staff.
We were seated at a booth and our drink orders were taken immediately. Unfortunately, we were late for the lunch buffet and too early for the dinner buffet, so needed to order from the ala carte menu. There was much to choose from and the choice was difficult as we wanted to try so much. Next visit, a buffet is a must to experience the variety Golden Dragon offers.
The Wonton Soup is a rich broth filled with vegetables and delicate wontons.
The Eggdrop Soup has a broth similar to the Wonton Soup, but thicker and it also contains vegetables, but cut finer.
Either soup would be an excellent choice as a meal alone, or for comfort if hit with a cold or flu.
Main courses were Chicken with Broccoli and Chicken Chop Suey; Fried Rice and Egg Rolls (served with sweet and sour sauce). Both chicken dishes were loaded with thinly sliced white breast meat and vegetables with light sauces, but flavorful. The fried rice was moist and tender; the egg rolls were crispy and absolutely delicious. This meal was for four people and we still ended up taking food home; and the bill did not break our wallet at all.
If in the mood for Chinese cuisine, the Golden Dragon's cave is where you want your table set.
Mary Cokenour

2324 E. Main Street
Farmington, NM, 87401
(505) 325-5100
Website: N/A
Located directly next to Fresh for Less on Farmington's Main Street is the Golden Dragon Chinese Restaurant. This restaurant is open seven days a week and offers lunch and dinner buffets besides the regular ala carte menu. While it boasts the typical Oriental art upon its walls, the restaurant is open and welcoming, as is the staff.
We were seated at a booth and our drink orders were taken immediately. Unfortunately, we were late for the lunch buffet and too early for the dinner buffet, so needed to order from the ala carte menu. There was much to choose from and the choice was difficult as we wanted to try so much. Next visit, a buffet is a must to experience the variety Golden Dragon offers.
The Wonton Soup is a rich broth filled with vegetables and delicate wontons.
The Eggdrop Soup has a broth similar to the Wonton Soup, but thicker and it also contains vegetables, but cut finer.
Either soup would be an excellent choice as a meal alone, or for comfort if hit with a cold or flu.
Main courses were Chicken with Broccoli and Chicken Chop Suey; Fried Rice and Egg Rolls (served with sweet and sour sauce). Both chicken dishes were loaded with thinly sliced white breast meat and vegetables with light sauces, but flavorful. The fried rice was moist and tender; the egg rolls were crispy and absolutely delicious. This meal was for four people and we still ended up taking food home; and the bill did not break our wallet at all.
If in the mood for Chinese cuisine, the Golden Dragon's cave is where you want your table set.
Mary Cokenour

Labels:
ala carte menu,
buffet,
Chicken and Broccoli,
chicken chop suey,
Chinese,
egg rolls,
food blog,
food porn,
Fried Rice,
Golden Dragon,
Mary Cokenour,
recipes,
restaurant,
restaurant review,
soup
Sunday, November 13, 2011
Briskets and Gravy.
As much as I love to grill and smoke meats, I am not one of those extreme die hards who are out there in any type of weather manning the grill and/or smoker. What a quandry though when you are craving a good brisket, but don't want to deal with the cold weather outside. That's where the crock pot comes in and becomes a best friend; always willing to help out and never complaininng.
After defrosting a four pound beef brisket and trimming excess fat off; I gave it a good massage with my All Purpose Rub. Sealing it inside an airtight container and popping it into the refrigerator, the preparations for Funeral Potatoes was begun. I didn't have any corn flakes on hand though, so a nice layer of shredded sharp cheddar cheese became my topping. Covered with plastic wrap, into the refrigerator that went to keep the brisket company overnight.
Next morning I got the crock pot out; the brisket went inside with all the other ingredients needed. I knew that the onions, tomatoes, chilies and garlic would not just help enhance the flavor of the brisket, but tenderize and moisturize. The rub on the brisket would help season those ingredients also, so the resulting gravy would be awe inspiring.
That evening I knew when Roy would be coming home from work, so I put the Funeral Potatoes in the oven, so they would be ready at the same time as the brisket and gravy. Result? Between the "Hmmm's" and "Oh my's", Roy was able to tell me that this was one of the best meals he'd ever enjoyed. The gravy was stupendous and the threat to eat a bowl of just that was made; he absolutely could not believe how deliciously awesome it was. He kept telling me that the brisket just melted in his mouth, and I have to agree that it was the tenderest brisket I've ever eaten. The Funeral Potatoes were a perfect accompaniment; the flavors melding so well with the beef and gravy.
Ain't that a kicker though, a crock pot giving a grill a run for it's money.
Crock Pot Beef Brisket and Gravy
Ingredients:
4-5 lb beef brisket, trimmed of fat
½ cup all purpose rub
1 (10.5 oz) can French onion soup plus ½ can water
1 (14.5 oz) can diced tomatoes with green chilies – mild
1 ½ Tbsp minced garlic
4 Tbsp flour
Preparation:
Thoroughly coat, and massage in, all sides of brisket with rub; place in airtight plastic container or bag and refrigerate overnight.
Set 6 qt crock pot on low; spray inside with nonstick cooking spray. Place soup, water, tomatoes and garlic in crock pot; whisk in flour until incorporated well. Immerse brisket into liquid, cover and cook for 8 hours.
Remove brisket to rest before slicing. Set crock pot to high; using an immersion blender in the crock pot, or placing liquid into stand blender, puree tomatoes and onions. Let pureed liquid cook for 15 minutes to thicken. Serve over sliced brisket; also good for a gravy over mashed potatoes and/or biscuits.
Makes 8-10 servings.
Mary Cokenour
After defrosting a four pound beef brisket and trimming excess fat off; I gave it a good massage with my All Purpose Rub. Sealing it inside an airtight container and popping it into the refrigerator, the preparations for Funeral Potatoes was begun. I didn't have any corn flakes on hand though, so a nice layer of shredded sharp cheddar cheese became my topping. Covered with plastic wrap, into the refrigerator that went to keep the brisket company overnight.
Next morning I got the crock pot out; the brisket went inside with all the other ingredients needed. I knew that the onions, tomatoes, chilies and garlic would not just help enhance the flavor of the brisket, but tenderize and moisturize. The rub on the brisket would help season those ingredients also, so the resulting gravy would be awe inspiring.
That evening I knew when Roy would be coming home from work, so I put the Funeral Potatoes in the oven, so they would be ready at the same time as the brisket and gravy. Result? Between the "Hmmm's" and "Oh my's", Roy was able to tell me that this was one of the best meals he'd ever enjoyed. The gravy was stupendous and the threat to eat a bowl of just that was made; he absolutely could not believe how deliciously awesome it was. He kept telling me that the brisket just melted in his mouth, and I have to agree that it was the tenderest brisket I've ever eaten. The Funeral Potatoes were a perfect accompaniment; the flavors melding so well with the beef and gravy.
Ain't that a kicker though, a crock pot giving a grill a run for it's money.
Crock Pot Beef Brisket and Gravy
Ingredients:
4-5 lb beef brisket, trimmed of fat
½ cup all purpose rub
1 (10.5 oz) can French onion soup plus ½ can water
1 (14.5 oz) can diced tomatoes with green chilies – mild
1 ½ Tbsp minced garlic
4 Tbsp flour
Preparation:
Thoroughly coat, and massage in, all sides of brisket with rub; place in airtight plastic container or bag and refrigerate overnight.
Set 6 qt crock pot on low; spray inside with nonstick cooking spray. Place soup, water, tomatoes and garlic in crock pot; whisk in flour until incorporated well. Immerse brisket into liquid, cover and cook for 8 hours.
Remove brisket to rest before slicing. Set crock pot to high; using an immersion blender in the crock pot, or placing liquid into stand blender, puree tomatoes and onions. Let pureed liquid cook for 15 minutes to thicken. Serve over sliced brisket; also good for a gravy over mashed potatoes and/or biscuits.
Makes 8-10 servings.
Mary Cokenour
Labels:
beef brisket,
comfort food,
crockpot,
food blog,
food porn,
funeral potatoes,
gravy,
grill,
Mary Cokenour,
recipes,
smoker
Wednesday, November 9, 2011
Native American Foods - Navajo Fry Bread
The first time I ever had Navajo Fry Bread was in October 2008 at the Moab Farmers' Market. Deep fried with cinnamon and sugar over it; it was awesomely delicious. It reminded me very much of the zeppoli I used to get when I lived in New York, just a flatter version.
My apologies to the Navajo Nation and my Navajo friends if I get the information too sketchy or not totally correct regarding Fry Bread. The Navajo dinetah (homeland) is bordered by the four sacred mountains, from northeastern Arizona, western New Mexico and north into Utah and Colorado. In 1863, Kit Carson was sent to meet with the Navajo to arrange surrender to the United States Army, but that was not to be. So, their lands were burned and those that were captured were forced to march (what became to be known as "Long Walks") to Fort Sumner. A 300 mile walk where many of the Navajo died from exhaustion and starvation. At the Fort, as many as 9000 Natives were forced to live in deplorable conditions; the government supplies of lard, flour, salt, sugar, baking powder or yeast, and powdered milk were often rancid. Fry bread came from these few foods provided during the 4 years of captivity.
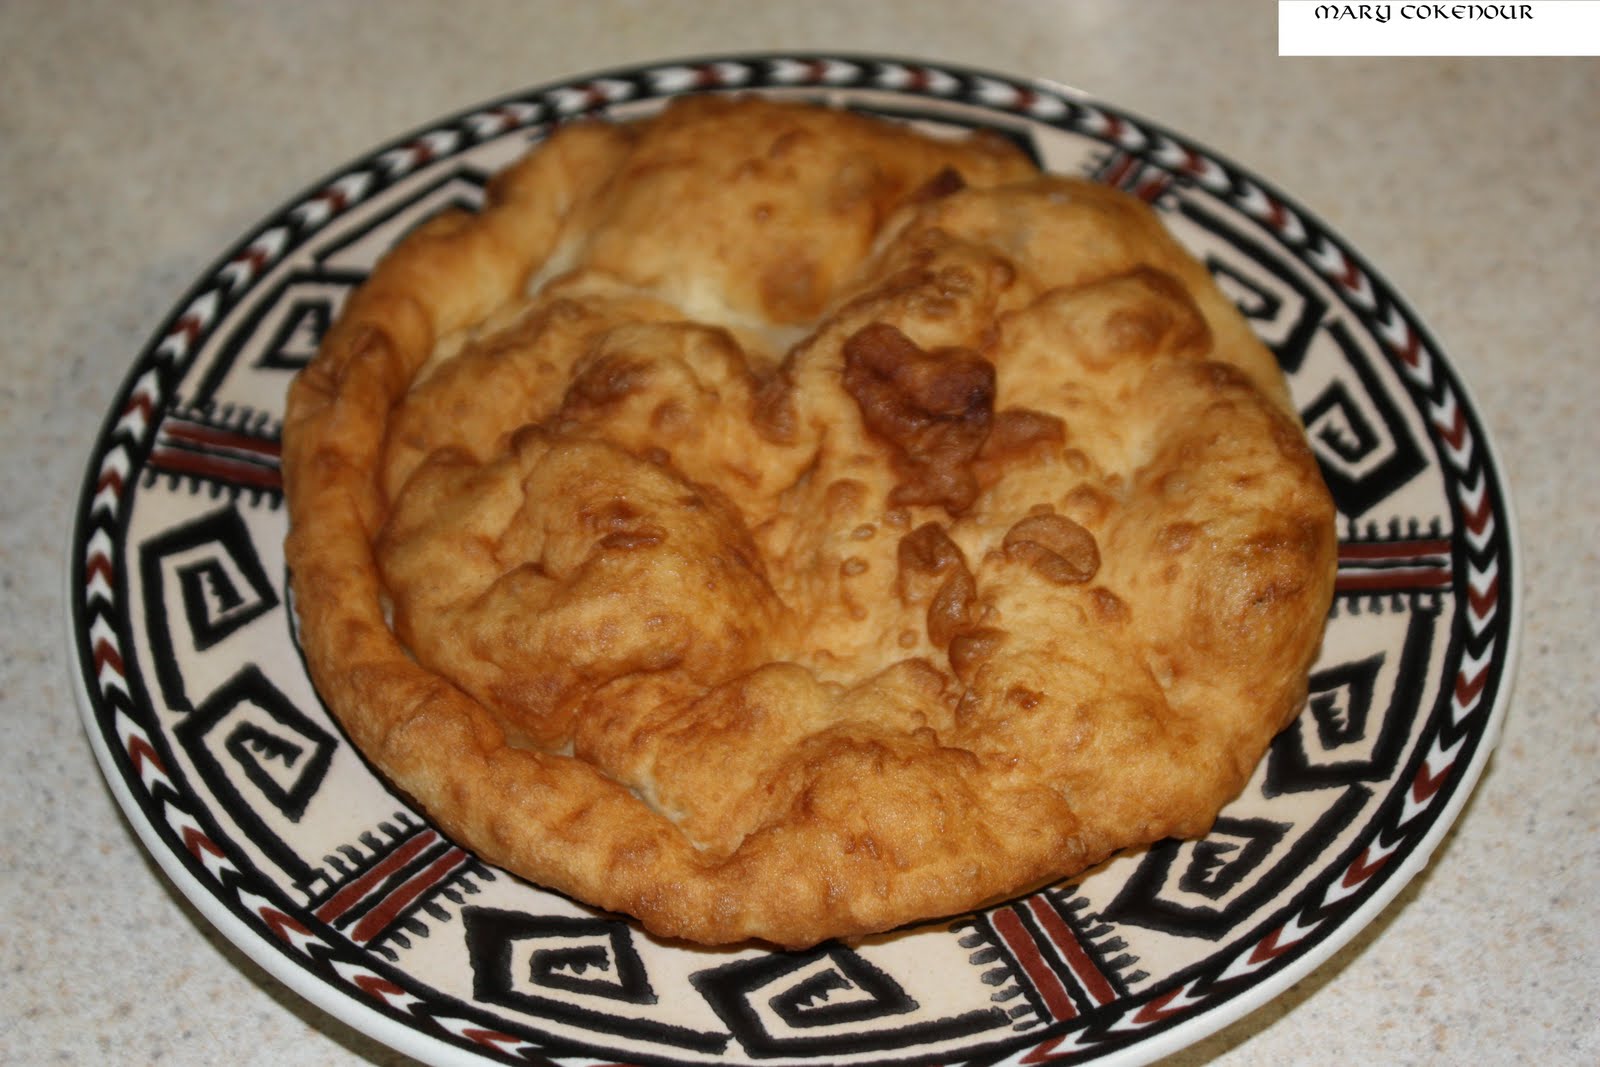
The above photo is of Fry Bread made by a friend here in Monticello, Anita Hathale. Anita is Navajo and a marvelous weaver which she learned from her mother; she also makes a wonderful Fry Bread. As you can see though, it is not totally flat, like a tortilla or pita would be and it can be eaten many ways. Fresh and hot just out of the fryer; coated with cinnamon and sugar, drizzled with honey; or as a Navajo Taco - seasoned meat, salsa, guacamole, grated cheese and sour cream. The Twin Rocks Cafe in Bluff also uses it to make pizza, and I know I'm trying that next time I get down there.
Now living in Southeastern Utah, it is part of the area known as "The Four Corners", and there is a monument area commemorating this. The monument is located 6 miles from Teec Nos Pos, AZ on the Colorado Plateau. While visiting the monument, one of the vendors there was making Fry Bread, and I was able to obtain a copy of his recipe. I am going to reprint the recipe as he had it written.
Navajo Fry Bread
Ingredients:
4 cups all purpose flour
2 Tbsp baking powder
2 tsp salt
1 1/2 to 2 cups very warm water
2 cups oil
Preparation:
1 - Mix dry ingredients together very well.
2 - Add water to dry ingredients and kneed well until dough is soft.
3 - Let it sit for 10-15 minutes (or longer).
4 - Break off golf ball size pieces of dough and pat or roll out to 1/4 inch thick.
5 - Heat 2 cups of oil and carefully place dough into the hot oil.
6 - Fry it to a golden brown and carefully turn and fry the other side.
7 - Drain on a paper towel. Sprinkle with powder sugar, cinnamon or other toppings to your liking.
Makes 8 servings.
Mary Cokenour
My apologies to the Navajo Nation and my Navajo friends if I get the information too sketchy or not totally correct regarding Fry Bread. The Navajo dinetah (homeland) is bordered by the four sacred mountains, from northeastern Arizona, western New Mexico and north into Utah and Colorado. In 1863, Kit Carson was sent to meet with the Navajo to arrange surrender to the United States Army, but that was not to be. So, their lands were burned and those that were captured were forced to march (what became to be known as "Long Walks") to Fort Sumner. A 300 mile walk where many of the Navajo died from exhaustion and starvation. At the Fort, as many as 9000 Natives were forced to live in deplorable conditions; the government supplies of lard, flour, salt, sugar, baking powder or yeast, and powdered milk were often rancid. Fry bread came from these few foods provided during the 4 years of captivity.
The above photo is of Fry Bread made by a friend here in Monticello, Anita Hathale. Anita is Navajo and a marvelous weaver which she learned from her mother; she also makes a wonderful Fry Bread. As you can see though, it is not totally flat, like a tortilla or pita would be and it can be eaten many ways. Fresh and hot just out of the fryer; coated with cinnamon and sugar, drizzled with honey; or as a Navajo Taco - seasoned meat, salsa, guacamole, grated cheese and sour cream. The Twin Rocks Cafe in Bluff also uses it to make pizza, and I know I'm trying that next time I get down there.
Now living in Southeastern Utah, it is part of the area known as "The Four Corners", and there is a monument area commemorating this. The monument is located 6 miles from Teec Nos Pos, AZ on the Colorado Plateau. While visiting the monument, one of the vendors there was making Fry Bread, and I was able to obtain a copy of his recipe. I am going to reprint the recipe as he had it written.
Navajo Fry Bread
Ingredients:
4 cups all purpose flour
2 Tbsp baking powder
2 tsp salt
1 1/2 to 2 cups very warm water
2 cups oil
Preparation:
1 - Mix dry ingredients together very well.
2 - Add water to dry ingredients and kneed well until dough is soft.
3 - Let it sit for 10-15 minutes (or longer).
4 - Break off golf ball size pieces of dough and pat or roll out to 1/4 inch thick.
5 - Heat 2 cups of oil and carefully place dough into the hot oil.
6 - Fry it to a golden brown and carefully turn and fry the other side.
7 - Drain on a paper towel. Sprinkle with powder sugar, cinnamon or other toppings to your liking.
Makes 8 servings.
Mary Cokenour
Labels:
comfort cook adventures,
food blog,
food porn,
fry bread,
frying,
Mary Cokenour,
Native American cooking,
Navajo,
Navajo Fry Bread,
recipes,
Southwestern
Subscribe to:
Posts (Atom)