Showing posts with label bruschetta. Show all posts

Wednesday, October 12, 2022

The Ultimate Italian Snack.

 When you want to nosh, what kind of appetizer or snack is your must have? Basic home snacks could be anything from a bag of chips, bowl of popped corn, crackers with a topping, veggies and dip, even cookies or a cupcake. If you are out at a restaurant, you might see on the menu: mozzarella sticks, cheese fries, nachos, deep fried veggies or ravioli, or chicken fingers. Been there, done that; same old, same old? Now is the time to try something very different, romantic (hey, it is Italian), yummy and healthier (I know, I know, bad word, especially around kids, but not this snack!).  Bruschetta, and while it might be a little difficult to pronounce the first time; you will not forget after you have had it.

Bruschetta (Italian pronunciation: [brus-ket-a]; American pronunciation: [bu-shetta], ignoring the “c” altogether) is an appetizer from central Italy whose origin seems to date back to the 15th century, but possibly even older than that. It was a way to use stale bread by toasting or grilling it, then enhancing the flavor by rubbing with garlic and topping with extra-virgin olive oil, salt and pepper. Variations may include toppings of spicy red pepper, tomato, vegetables, beans, cured meat, and/or cheese.  The most popular recipe, especially in America, involves basil, fresh tomato, garlic and onion, or mozzarella; similar to a snack version of Pizza Margherita.  Brushchetta can be served as an appetizer, simply enjoyed as a snack, or depending on the ingredients, and work put into it, a meal.


Bruschetta (Italian Style)

Ingredients:

loaf of Italian bread, preferably day old, cut into ½” slices

2 cloves of garlic

olive oil

salt

Preparation:

Grill both sides of the sliced bread; or place under a broiler for one minute, flip slices, place under broiler for another minute. Cut the cloves of garlic in half and rub cut sides over one side of bread; drizzle olive oil, sprinkle on salt.


Bruschetta Con Pomodori (Grilled Bread with Tomatoes)

Ingredients:

half loaf of Italian bread, cut into ½ “slices

1 Tbsp. minced garlic

4 Tbsp. olive oil

6 Roma (plum) tomatoes cut into ¼” pieces

1/8 tsp. each of salt and ground black pepper

¼ cup minced fresh basil leaves

2 Tbsp. balsamic vinegar

Preparation:

Grill both sides of the sliced bread; or place under a broiler for one minute, flip slices, place under broiler for another minute. Smear one side of each slice with minced garlic.

In a small bowl, mix together olive oil, tomatoes, salt, black pepper, basil and vinegar. Top garlic side of each slice of bread with mixture.

Makes 6 servings.

Note:

1 – Shaved parmesan cheese can be placed on top of mixture.

2 – Thin slices of mozzarella can be placed on top of mixture; place under broiler for a minute to allow cheese to melt.


These are the two basic appetizer/snack recipes for making bruschetta.  Now let us get to the meal versions, or should I say, my experiments in bruschetta style meals.

This recipe was published in Taste of Home Magazine, September 2007 issue. I had sent it to them way back in 1997, and then suddenly they contacted me in 2007 to say that they were going to publish it. Imagine my surprise! (https://www.tasteofhome.com/recipes/crab-bruschetta/)


Crab Bruschetta

Ingredients:

1/2 cup finely chopped shallots

2 garlic cloves, minced

2 Tbsp. plus 1/4 cup olive oil, divided

2 cans (6 ounces each) lump crabmeat, drained

1 cup chopped seeded plum tomatoes

1 and ½ tsp. minced fresh basil or 1/2 tsp. dried basil

3/4 tsp. minced fresh oregano or 1/4 tsp. dried oregano

8 slices Italian bread (1/2 inch thick)

Preparation:

In a large skillet, sauté’ shallots and garlic in 2 tablespoons oil until tender. Add the crab, tomatoes, basil and oregano; cook and stir for 5-6 minutes or until heated through. Remove from the heat.

Brush both sides of each slice of bread with remaining oil. In another large skillet, toast bread for 1-2 minutes on each side. Cut each slice in half; top with crab mixture.

Makes 16 appetizers, or 8 meals.

This next meal version I say is “bruschetta without the bread”.  Having received some eggplant, I figured I would make the same old, same old eggplant parmigiana.  Roy and I both do not like eggplant, so it gets distributed to his mom and brother, down in Moab; and Richard Watkins down in Blanding. However, a recipe that used eggplant as the top and bottom of a sandwich type appetizer/main course item, with spaghetti and sauce as the filling, appeared on my newsfeed.  While the photo looked pretty, I truly did not see the point of it; but it did get my mind going into a creative direction.

To the refrigerator I went to look for ingredients that would work with the eggplant; Roma tomatoes and mozzarella cheese, but then I spied the chicken cutlets defrosted for another recipe.  Suddenly the picture of a recipe came into my mind, like little photos, and I was off and cooking!  The eggplant would be the base ingredient, just as bread was for bruschetta; olive oil, garlic, Italian herbs, tomatoes and cheese were a given.  The chicken, however, would give the entire dish a new dimension in flavor and texture; this would be one of those recipes that could be an appetizer or a main meal.

Enough chit chat and let’s get to cooking...
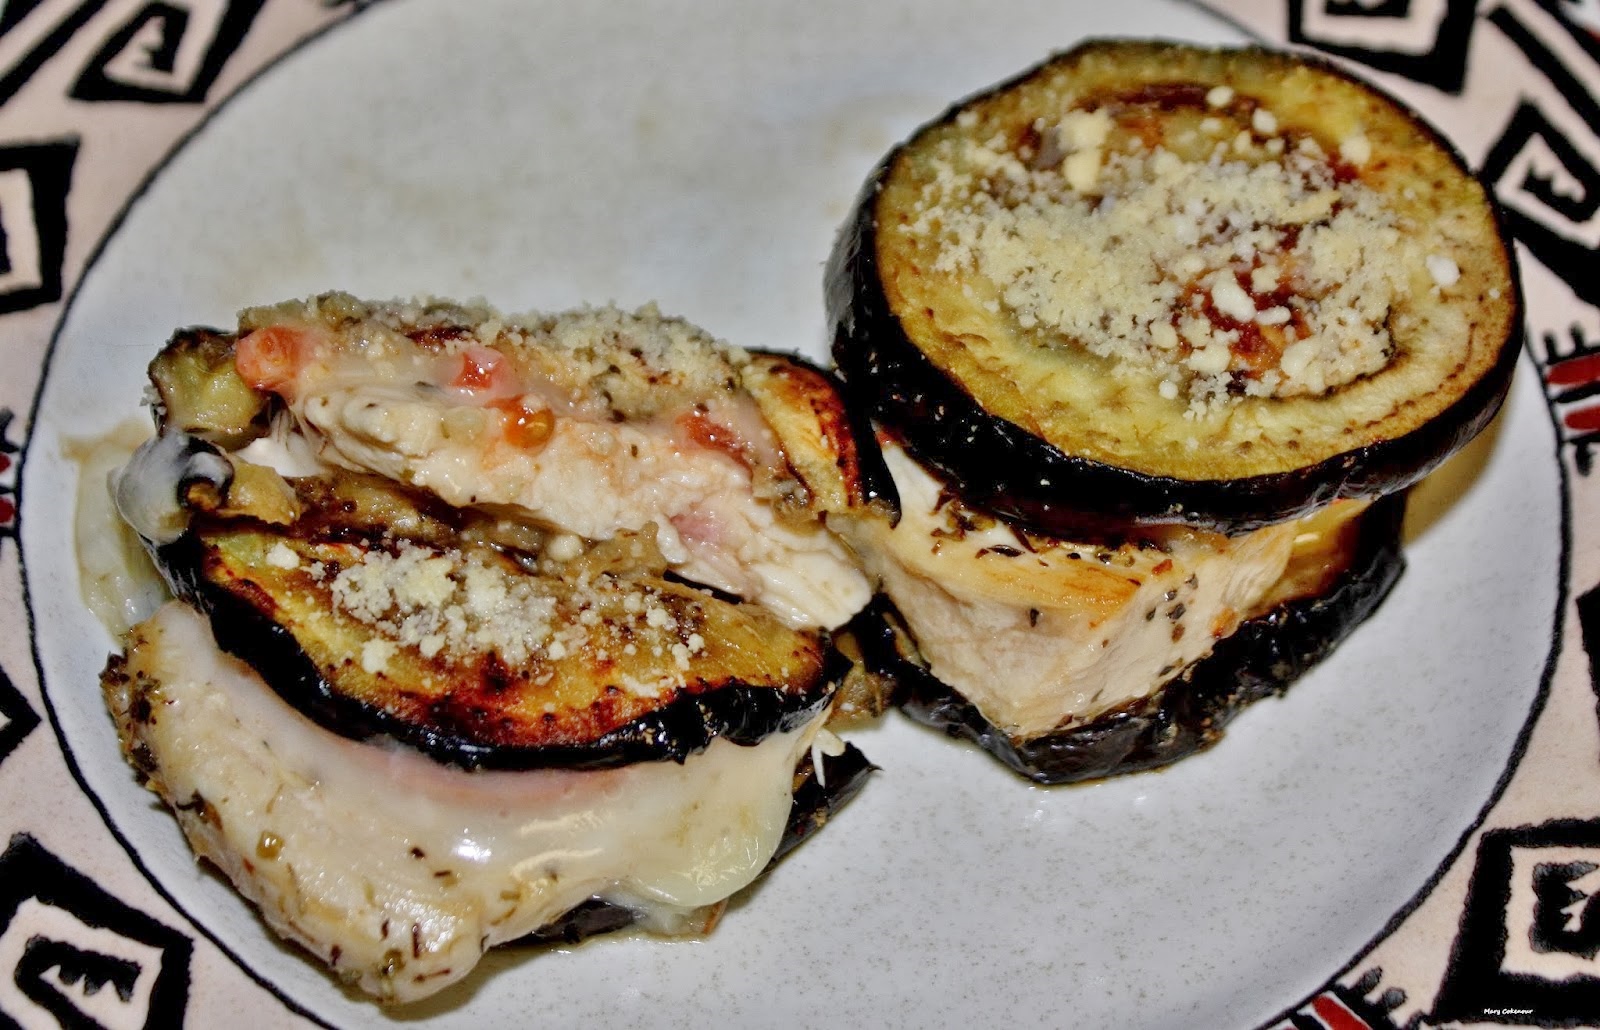


Eggplant-Chicken Bruschetta

Ingredients:

1 medium sized eggplant cut into 12 (1/4" thick) slices

3 tsp. salt

1 tsp. garlic powder

4 Tbsp. olive oil, divided in half

1 Tbsp. Italian herbal mix

6 pieces boneless, skinless chicken breasts (1/4" thick, cut to equal or slightly larger size than eggplant slices)

6 slices Roma tomatoes

6 slices mozzarella cheese

3 tsp. grated Parmesan cheese

Preparation:

Line a platter or baking sheet with paper towels; lay out eggplant slices, sprinkle with salt and cover with additional paper towels.  Wait a minimum of one hour before pressing the paper towels onto the eggplant to remove excess water that has been drawn out by the salt.

Heat 2 tablespoons of oil, medium-high heat, in a large skillet; place eggplant into skillet, brown one side, turn to brown other side and sprinkle garlic powder over first browned side.  Remove to paper towels.

Put remaining oil into skillet plus herbal mix; place chicken into skillet and brown both sides; remove to paper towels.  Preheat oven to 375F; line a baking sheet with aluminum foil.

Build a stack: eggplant slice, chicken piece, tomato slice, cheese slice, eggplant slice.  When all stacks are made, place on the baking sheet and top with 1/2 teaspoon of grated cheese.  Bake in oven for 5 to 7 minutes to allow mozzarella cheese to melt.

Makes 6 servings for an appetizer; Makes 3 servings for a meal.

Mary Cokenor

Wednesday, September 30, 2020

Red Tomato Harvest.

September 22, 2020; the first day of autumn, the beginning of Mabon and celebration of the fall season.  Mabon is the Second Harvest; a reflection of the past, gratitude for the present, blessings for the future.  A week-long celebration in which the bounties of fruits, vegetables and grains are harvested for the final time.  Pickling, jamming, jellies, bread making, dehydrating, roasting, and food preservation are the major goals.  Winter, depending upon where one lives, can be knocking at the door at any moment.

In my previous article, we visited the taste treat of Fried Green Tomatoes.  I bet many of the home cooks tried it, but I bet many others pickled those green tomatoes for future use.  Since this is time for Second Harvest, consider this a second article to figure out what to do with all those extra red tomatoes.  While they can be canned or frozen whole, homemade pasta sauce and salsa are very much delicious options.   However, two other options are dehydrating and roasting. 

Dehydration is extracting all moisture from a thinly sliced food item, then sealing it in air tight packaging.  It can be seasoned before processing, but be careful as anything added will be greatly intensified in flavor.  Jerky?  Yes, this is made through the dehydration process, as is “fruit leather”.  Owning a dehydrator makes the process easier, less messy, more hygienic, but still time consuming.  Cutting the ripe, red tomatoes into one quarter inch slices, space them out on the dehydrator disks.  Cover, turn on the device and my three trays still took eight hours to completion.  If all five trays had been used, the time would have been ten to twelve hours.  Once completely dried, carefully lift the slices which have shrunk to 1/8th of an inch thin.  I placed mine in a resealable plastic bag, making sure to, carefully, squeeze out the air, before sealing.  Yes, a container can be used, but it is air that will destroy all your hard work by creating mold on the tomato slices.  Keep them in a cool, dry, dark environment; heat and light are not friends to dried foods.  In a cabinet, they will keep for six months; stored in a freezer is a one year bounty!

Freshly sliced tomatoes in dehydrator.

Dried tomato slices.

Dehydrated Tomatoes

The other method for drying out tomatoes is to Sun Dry.  The tomatoes are sliced, placed on parchment lined trays and exposed to the sun until completely dried out.  This method takes days, leaves the tomatoes open to the air, and anything air borne.  While, in Utah, the red dust of our magnificent sandstone formations is nicknamed “seasoning”, do we really want it on our drying tomatoes?  Then there are insects, falling leaves, pet hair, and who knows what other non-tasty and unhealthy yuck that might get added in.  So, as you can guess, I am partial to a dehydrator.

What can dehydrated tomatoes be used for?  First, they can easily be rehydrated by soaking in hot water for thirty minutes.  Chop them up to add to salads, slices onto sandwiches, or anything else tomatoes are called for.  They can, also, simply be crushed or ground up to be added to soups, stews, dressings, and basically any dish calling for seasoning.  Dried tomatoes have intensified tomato flavor, so add a sweet/tart/tangy balance to a recipe.

Roasted tomatoes will not keep as long as dried.  Up to five days in the refrigerator, only six months if frozen.  Reason being is the cooked olive oil which can eventually turn rancid, even if frozen.  However, these little tidbits are so exquisitely delicious, they will not last long anyway!

Preheating the oven to 450F, slice the tomatoes, again, to one quarter inch thickness.  If using cherry tomatoes, simply cut in half.  In a large bowl, mix the tomatoes with a half cup of olive oil  (this is for 6-8 large Roma tomatoes), one quarter cup of Italian herbal mix, one tablespoon garlic powder, 1 teaspoon ground black pepper, one half teaspoon of fine sea salt. 


Place the tomato slices, or halves, in rows, onto jelly roll pans (the sides will keep the oil from leaking onto the oven floor).  Roast for 20-25 minutes in the oven; any longer and they will begin to turn too mushy.  Let cool for 15 minutes before placing in air tight containers or bags.


Roasted Tomatoes

You will be tasting them, I know you cannot resist!  Have any frozen pizza in the freezer?  Unwrap, place a few slices of the roasted tomatoes on it, and then rewrap.  Wait until you finally bake that pizza, the taste will make your eyes pop out!


How about some Bruschetta?  While the tomatoes are roasting, brush thick slices of Italian or French bread (even sub rolls will work) lightly with olive oil.  Once the tomatoes are done, space them out on the bread, top with shredded mozzarella and pop back into that 450F oven for 15-18 minutes.  One bite, and you will be totally in love!


Bruschetta and Roasted Tomatoes

Joyous Mabon, Welcome Autumn, Second Harvest is here, Celebrate and eat some tomatoes!

Mary Cokenour

Saturday, November 30, 2013

Bruschetta Without the Bread.

Whenever Bruschetta is on a menu, it is usually listed under "Appetizers"; an Italian antipasto made with grilled bread as the base ingredient. Recently I received an eggplant and figured I would make the same old, same old eggplant parmigiana; Roy and I don't like eggplant, so this dish usually goes to his mom. Then I saw a recipe on Facebook that used eggplant as the top and bottom of a sandwich type appetizer/main course item with spaghetti and sauce as the filling. While the photo looked pretty, I truly didn't see the point of it; but it did get my mind going into a creative direction.

To the refrigerator I went to look for ingredients that would work with the eggplant; Roma tomatoes and mozzarella cheese, but then I spied the chicken cutlets I had defrosted for another recipe.  Suddenly the picture of the recipe I was to make came into my mind like little photos, and I was off!  The eggplant would be the base ingredient, just as bread was for bruschetta; olive oil, garlic, , Italian herbs, tomatoes and cheese were a given.  The chicken, however, would give the entire dish a new dimension in flavor and texture; this would be one of those recipes that could be an appetizer or a main meal.

Enough chit chat and lets get to cooking...


Eggplant-Chicken Bruschetta

Ingredients:

1 medium sized eggplant cut into 12 (1/4" thick) slices
3 tsp salt
1 tsp garlic powder
4 Tbsp olive oil, divided in half
1 Tbsp Italian herbal mix
6 pieces boneless, skinless chicken breasts (1/4" thick, cut to equal or slightly larger size than eggplant slices)
6 slices Roma tomatoes
6 slices mozzarella cheese
3 tsp grated Parmesan cheese


Preparation:


Line a platter or baking sheet with paper towels; lay out eggplant slices, sprinkle with salt and cover with additional paper towels.  Wait a minimum of one hour before pressing the paper towels onto the eggplant to remove excess water that has been drawn out by the salt. 


Heat 2 tablespoons of oil, medium-high heat, in a large skillet; place eggplant into skillet, brown one side, turn to brown other side and sprinkle garlic powder over first browned side.  Remove to paper towels.


Put remaining oil into skillet plus herbal mix; place chicken into skillet and brown both sides; remove to paper towels.  Preheat oven to 375F; line a baking sheet with aluminum foil.


Build a stack: eggplant slice, chicken piece, tomato slice, cheese slice, eggplant slice.  When all stacks are made, place on the baking sheet and top with 1/2 tsp of grated cheese.  Bake in oven for 5 to 7 minutes to allow mozzarella cheese to melt.


Makes 6 servings for an appetizer; Makes 3 servings for a meal.

Mary Cokenour

Tuesday, February 22, 2011

The Ultimate Italian Snack (Appetizer)

When you want to nosh, what kind of appetizer or snack would you have? Basic home snacks could be anything from crackers with a topping, veggies and dip, even cookies or a cupcake. If you're out at a restaurant, you might see on the menu: cheese sticks, nachos, tequitos, deep fried veggies, chicken fingers. Been there, done that, lets have something very different, romantic(hey, it's Italian), yummy and it's healthy (I know, I know, bad word, especially around kids, but not this snack!) It's Bruschetta, and while it might be a little difficult to pronounce the first time; you won't forget after you've had it.

Bruschetta (Italian pronunciation: [brus-ket-a]; American pronunciation: [bu-shetta], ignoring the “c” altogether ) is an appetizer from central Italy whose origin seems to date back to the 15th century, but possibly even older than that. It was a way to use stale bread by toasting or grilling it, then enhancing the flavor by rubbing with garlic and topping with extra-virgin olive oil, salt and pepper. Variations may include toppings of spicy red pepper, tomato, vegetables, beans, cured meat, and/or cheese; the most popular recipe outside of Italy involves basil, fresh tomato, garlic and onion or mozzarella. Brushchetta can be served as an appetizer, or simply enjoyed as a snack.

Bruschetta (Italian Style)

Ingredients:

loaf of Italian bread, preferably day old, cut into ½” slices
2 cloves of garlic
olive oil
salt

Preparation:

Grill both sides of the sliced bread; or place under a broiler for 1 minute, flip slices, place under broiler for another minute. Cut the cloves of garlic in half and rub cut sides over one side of bread; drizzle olive oil, sprinkle on salt.


Bruschetta Con Pomodori (Grilled Bread with Tomatoes)

Ingredients:

half loaf of Italian bread, cut into ½ “slices
1 Tbsp minced garlic
4 Tbsp olive oil
6 Roma (plum) tomatoes cut into ¼” pieces
1/8 tsp each of salt and ground black pepper
¼ cup minced fresh basil leaves
2 Tbsp balsamic vinegar

Preparation:

Grill both sides of the sliced bread; or place under a broiler for 1 minute, flip slices, place under broiler for another minute. Smear one side of each slice with minced garlic.

In a small bowl, mix together olive oil, tomatoes, salt, black pepper, basil and vinegar. Top garlic side of each slice of bread with mixture.

Makes 6 servings.

Note:
1 – Shaved parmesan cheese can be placed on top of mixture.

2 – Thin slices of mozzarella can be placed on top of mixture; place under broiler for a minute to allow cheese to melt.

Mary Cokenour
September 1997
~~~~~~~~~~~~~~~~~~~~~~~~~~~~~~~~~~
This recipe was published in Taste of Home Magazine, September 2007 issue. I had sent it to them way back in 1997, and then suddenly they contacted me in 2007 to say that they were going to publish it. Imagine my surprise!


Crab Bruschetta

Ingredients:

1/2 cup finely chopped shallots
2 garlic cloves, minced
2 tablespoons plus 1/4 cup olive oil, divided
2 cans (6 ounces each) lump crabmeat, drained
1 cup chopped seeded plum tomatoes
1-1/2 teaspoons minced fresh basil or 1/2 teaspoon dried basil
3/4 teaspoon minced fresh oregano or 1/4 teaspoon dried oregano
8 slices Italian bread (1/2 inch thick)

Preparation:
In a large skillet, saute shallots and garlic in 2 tablespoons oil until tender. Add the crab, tomatoes, basil and oregano; cook and stir for 5-6 minutes or until heated through. Remove from the heat.

Brush both sides of each slice of bread with remaining oil. In another large skillet, toast bread for 1-2 minutes on each side. Cut each slice in half; top with crab mixture.

Makes16 appetizers.


Mary Cokenour
September 1997