Showing posts with label appetizer. Show all posts

Wednesday, June 21, 2023

This Little Piggy.

This Little Piggy

By Mother Goose

“This little piggy went to market,

This little piggy stayed home,

This little piggy had roast beef,

This little piggy had none.

This little piggy went ...

Wee, wee, wee,

all the way home!”

However, my little piggies ended up inside bacon, crescent roll dough and pancakes!


In 1957, a cute recipe appeared in the new Betty Crocker’s Cooking for Boys and Girls cookbook.  This cookbook was geared towards parents, alright, let’s be honest, the homemaker mom, to teach her children cooking skills.  Hotdogs were baked inside a bread dough, and enjoyed for lunch or dinner.  In 1965, Pillsbury introduced crescent rolls, and included a recipe for crescent roll dogs which added slices of American cheese to the process.

The name “pigs in a blanket” is another one of those “Who claims to have invented it first?” origins.  Essentially the “pigs” refer to sausages that were roasted, wrapped in rolls, and eaten by laborers.  This is traced back to Germany, around the 1400s (remember, they also invented the ever-popular hotdog) where they were called Würstchen im Schlafrock (translation: sausages in pajamas).  In the 1600s, the Irish, English and Scottish laborers were following the lead of German laborers, and ate these sausage rolls alongside meat pies and pasties.  In the 1900s, a recipe for “kilted soldiers” became popular for the Christmas holiday.   Small sausages, named chipolatas, were wrapped, and roasted, in bacon. The “cocktail” pigs in a blanket were basically born, and the bread wrapped version followed.


The breakfast style pigs in a blanket?  Grilled sausages wrapped in fluffy pancakes, drenched in maple syrup, breakfast style pigs in a blanket?  As far as I could ferret out of culinary sites, full of historical data, was linked to IHOP.  The first International House of Pancakes opened in a suburb of Los Angeles in 1958, and breakfast style pigs in a blanket was on the menu.  I have to presume that they got the idea from the 1957 Betty Crocker cookbook, revised it by using thinner pancakes for easy rolling, instead of bread or crescent dough, and it was a hit.


The concept of wrapping sausage inside some type of dough is worldwide, however, in America, hotdogs are used more often.  Sausage is primarily made with meat from the pig, while hotdogs can be all-beef, poultry only, or some combination of pork, beef and poultry.  For a meal, full length hotdogs, smoked sausages, or grilled brats can be rolled in dough, baked in the oven, and served with condiments and side dishes.  The cocktail style are the mini versions of the meats, again, also wrapped in dough and baked. 


Now making those is a lot of work, but there is a much easier way of course.  Purchase the full length, wrap in the dough and cut them up into bite size, individual pieces before baking.  First off, this is less work than wrapping those tiny “little smokies” or cocktail franks, and price wise, less expensive in the long run.  Do a price comparison, and depending on where you live, and prices charged at your favorite market, it probably will be less in price.  Also, compare your prices to buying the premade, frozen brands; make sure to check how many are in the package.  One can of crescent roll dough has eight pieces; one package of hotdogs is, usually, also eight.  After rolling the hotdog in the dough (make sure to seal up the dog completely), cut into four sections; that is 32 pieces.  Unless you are buying from a bulk store, the average size at a local market is 12-24 pieces, and the price is kind of high for the amount inside the package.  You are paying, for the convenience, of having the work done for you.


20 minutes at 375F.


Another plus, to making it at home, is you can add what you want; press shredded cheese, bacon bits, diced jalapenos, diced onions, or savory seasonings onto the dough, then procced with the wrapping and baking.  The dough is your canvas, now be a culinary artist!  As I have pushed in many of my articles, children at home, get them involved, and they do not have to be little ones.  Get those teenagers and college-aged to learn kitchen skills as well; prep work, creation, completion, and clean up!


Summer will be officially beginning soon, and here come all the summery events, parties, picnics and simply having fun in the sun times.  Do not forget the perfect little snack for all those times, pigs in a blanket.


Mary Cokenour


Wednesday, October 12, 2022

The Ultimate Italian Snack.

 When you want to nosh, what kind of appetizer or snack is your must have? Basic home snacks could be anything from a bag of chips, bowl of popped corn, crackers with a topping, veggies and dip, even cookies or a cupcake. If you are out at a restaurant, you might see on the menu: mozzarella sticks, cheese fries, nachos, deep fried veggies or ravioli, or chicken fingers. Been there, done that; same old, same old? Now is the time to try something very different, romantic (hey, it is Italian), yummy and healthier (I know, I know, bad word, especially around kids, but not this snack!).  Bruschetta, and while it might be a little difficult to pronounce the first time; you will not forget after you have had it.

Bruschetta (Italian pronunciation: [brus-ket-a]; American pronunciation: [bu-shetta], ignoring the “c” altogether) is an appetizer from central Italy whose origin seems to date back to the 15th century, but possibly even older than that. It was a way to use stale bread by toasting or grilling it, then enhancing the flavor by rubbing with garlic and topping with extra-virgin olive oil, salt and pepper. Variations may include toppings of spicy red pepper, tomato, vegetables, beans, cured meat, and/or cheese.  The most popular recipe, especially in America, involves basil, fresh tomato, garlic and onion, or mozzarella; similar to a snack version of Pizza Margherita.  Brushchetta can be served as an appetizer, simply enjoyed as a snack, or depending on the ingredients, and work put into it, a meal.


Bruschetta (Italian Style)

Ingredients:

loaf of Italian bread, preferably day old, cut into ½” slices

2 cloves of garlic

olive oil

salt

Preparation:

Grill both sides of the sliced bread; or place under a broiler for one minute, flip slices, place under broiler for another minute. Cut the cloves of garlic in half and rub cut sides over one side of bread; drizzle olive oil, sprinkle on salt.


Bruschetta Con Pomodori (Grilled Bread with Tomatoes)

Ingredients:

half loaf of Italian bread, cut into ½ “slices

1 Tbsp. minced garlic

4 Tbsp. olive oil

6 Roma (plum) tomatoes cut into ¼” pieces

1/8 tsp. each of salt and ground black pepper

¼ cup minced fresh basil leaves

2 Tbsp. balsamic vinegar

Preparation:

Grill both sides of the sliced bread; or place under a broiler for one minute, flip slices, place under broiler for another minute. Smear one side of each slice with minced garlic.

In a small bowl, mix together olive oil, tomatoes, salt, black pepper, basil and vinegar. Top garlic side of each slice of bread with mixture.

Makes 6 servings.

Note:

1 – Shaved parmesan cheese can be placed on top of mixture.

2 – Thin slices of mozzarella can be placed on top of mixture; place under broiler for a minute to allow cheese to melt.


These are the two basic appetizer/snack recipes for making bruschetta.  Now let us get to the meal versions, or should I say, my experiments in bruschetta style meals.

This recipe was published in Taste of Home Magazine, September 2007 issue. I had sent it to them way back in 1997, and then suddenly they contacted me in 2007 to say that they were going to publish it. Imagine my surprise! (https://www.tasteofhome.com/recipes/crab-bruschetta/)


Crab Bruschetta

Ingredients:

1/2 cup finely chopped shallots

2 garlic cloves, minced

2 Tbsp. plus 1/4 cup olive oil, divided

2 cans (6 ounces each) lump crabmeat, drained

1 cup chopped seeded plum tomatoes

1 and ½ tsp. minced fresh basil or 1/2 tsp. dried basil

3/4 tsp. minced fresh oregano or 1/4 tsp. dried oregano

8 slices Italian bread (1/2 inch thick)

Preparation:

In a large skillet, sauté’ shallots and garlic in 2 tablespoons oil until tender. Add the crab, tomatoes, basil and oregano; cook and stir for 5-6 minutes or until heated through. Remove from the heat.

Brush both sides of each slice of bread with remaining oil. In another large skillet, toast bread for 1-2 minutes on each side. Cut each slice in half; top with crab mixture.

Makes 16 appetizers, or 8 meals.

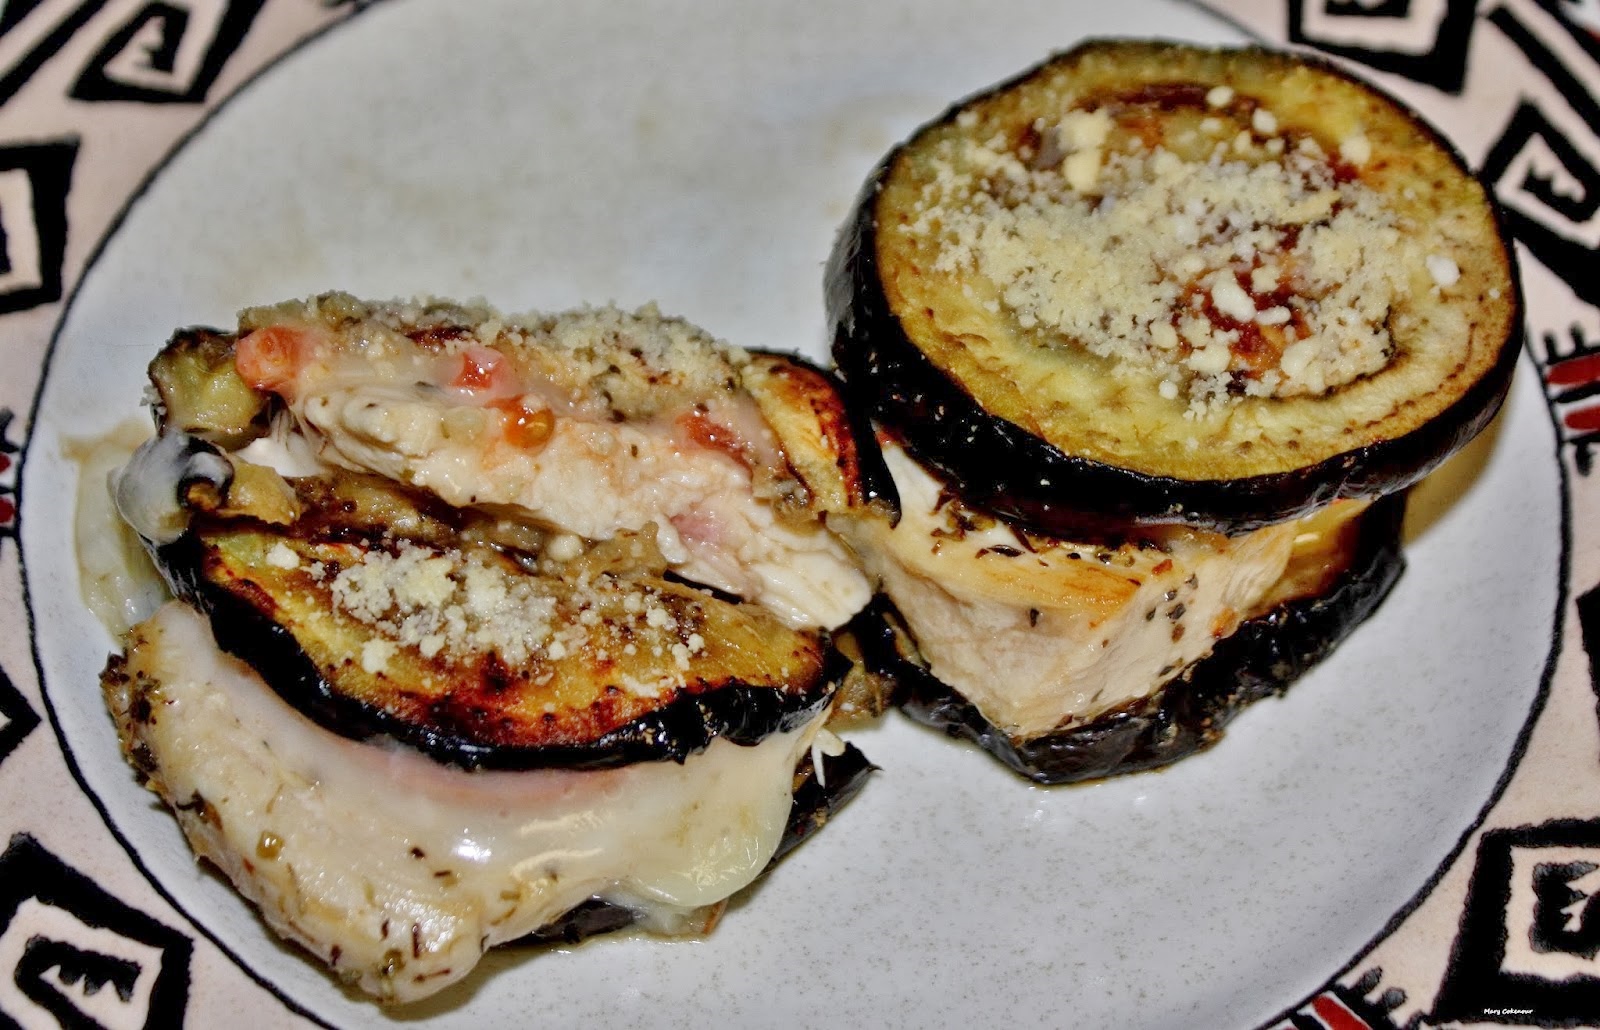
This next meal version I say is “bruschetta without the bread”.  Having received some eggplant, I figured I would make the same old, same old eggplant parmigiana.  Roy and I both do not like eggplant, so it gets distributed to his mom and brother, down in Moab; and Richard Watkins down in Blanding. However, a recipe that used eggplant as the top and bottom of a sandwich type appetizer/main course item, with spaghetti and sauce as the filling, appeared on my newsfeed.  While the photo looked pretty, I truly did not see the point of it; but it did get my mind going into a creative direction.

To the refrigerator I went to look for ingredients that would work with the eggplant; Roma tomatoes and mozzarella cheese, but then I spied the chicken cutlets defrosted for another recipe.  Suddenly the picture of a recipe came into my mind, like little photos, and I was off and cooking!  The eggplant would be the base ingredient, just as bread was for bruschetta; olive oil, garlic, Italian herbs, tomatoes and cheese were a given.  The chicken, however, would give the entire dish a new dimension in flavor and texture; this would be one of those recipes that could be an appetizer or a main meal.

Enough chit chat and let’s get to cooking...


Eggplant-Chicken Bruschetta

Ingredients:

1 medium sized eggplant cut into 12 (1/4" thick) slices

3 tsp. salt

1 tsp. garlic powder

4 Tbsp. olive oil, divided in half

1 Tbsp. Italian herbal mix

6 pieces boneless, skinless chicken breasts (1/4" thick, cut to equal or slightly larger size than eggplant slices)

6 slices Roma tomatoes

6 slices mozzarella cheese

3 tsp. grated Parmesan cheese

Preparation:

Line a platter or baking sheet with paper towels; lay out eggplant slices, sprinkle with salt and cover with additional paper towels.  Wait a minimum of one hour before pressing the paper towels onto the eggplant to remove excess water that has been drawn out by the salt.

Heat 2 tablespoons of oil, medium-high heat, in a large skillet; place eggplant into skillet, brown one side, turn to brown other side and sprinkle garlic powder over first browned side.  Remove to paper towels.

Put remaining oil into skillet plus herbal mix; place chicken into skillet and brown both sides; remove to paper towels.  Preheat oven to 375F; line a baking sheet with aluminum foil.

Build a stack: eggplant slice, chicken piece, tomato slice, cheese slice, eggplant slice.  When all stacks are made, place on the baking sheet and top with 1/2 teaspoon of grated cheese.  Bake in oven for 5 to 7 minutes to allow mozzarella cheese to melt.

Makes 6 servings for an appetizer; Makes 3 servings for a meal.

Mary Cokenor

Sunday, March 15, 2015

Jalapeno Peppers are a Popping!

One of my husband's favorite appetizers is the jalapeno popper; either made with cream cheese or cheddar cheese, but he prefers the cream cheese ones.  Not many restaurants use cream cheese, since it is softer than cheddar.  Then again, they also use smaller jalapenos, double batter to make them look huge, but have to cook them longer and cream cheese won't hold up.


I, in turn, find the largest peppers, stuff them with cheese, lightly batter; they fry up faster, the firm cream cheese melts to a perfect, creamy softness, and the peppers retain a certain amount of "scrunch".  By the way, with the light batter, the peppers put forth more of their "hotness"; whereas the thick double batter of restaurants tames the heat.

To each his/her own.  The light batter recipe I'll be giving you is great for any veggie you like to munch on after its been deep fried.


Batter for Frying Vegetables

Ingredients:

1/2 cup  flour
1/4 cup cornstarch
1 tsp. baking powder
1/4 tsp. salt
1/4 tsp. ground black pepper
1/4 tsp. garlic powder
pinch ground cayenne pepper
1/2 cup + 1 Tbsp. water
1 small egg, beaten
1 Tbsp. canola oil

Preparation:

In a medium size bowl, combine the flour, cornstarch, baking powder, salt, black pepper, garlic powder and cayenne pepper.

In a small bowl, combine all the water, beaten egg and oil; add wet ingredients to dry and combine until well mixed and batter is smooth.

Makes 1 and 1/2 cups.

Now comes the fun part, and you'll need to wear plastic gloves for this...cleaning and stuffing the peppers.  Find 6 to 8 large jalapeno peppers; slice off the tops about 1/8 of an inch down, discard; cut a slit lengthwise down the pepper; carefully remove the seeds and white pith without cracking or splitting the entire pepper. 

If you didn't already know, using the plastic gloves will keep your skin from absorbing the oil of the seeds.  If you decide to go gloveless; do NOT touch your face, especially the eyes.  The oil will not wash off, and you might have a burning or tingling sensation on your skin for a couple of days.

If using a deep fryer, follow its instructions on putting in the oil, and temperature setting.  I use a deep skillet, so fill it two inches with either canola or peanut oil; whichever I have on hand at the time.  Turn the heat to high, and it's ready when you flick a few drops of cold water into the oil, and you can hear it sizzle and pop.


To stuff them with the cream cheese, use about 2-3 tablespoons of firm (not whipped) cream cheese.  It's easier to simply use your fingers to stuff them; don't over stuff; you want to make sure the cheese is not coming out of the top, and that the sides of the lengthwise slit can close together.


Put each stuffed pepper into the batter individually; use a fork to lift the batter coated pepper out and let the excess drip off.  Then place into the deep fryer or oil filled skillet; don't do more than two at a time, or the oil temperature will go down too fast.  If you need to, turn the peppers after 3-5 minutes to brown the other side.  Remove from the oil and drain on paper towels.


Now enjoy as is, as dip into your favorite sauce...ranch, southwestern ranch and bleu cheese work the best.

Mary Cokenour


Saturday, November 30, 2013

Bruschetta Without the Bread.

Whenever Bruschetta is on a menu, it is usually listed under "Appetizers"; an Italian antipasto made with grilled bread as the base ingredient. Recently I received an eggplant and figured I would make the same old, same old eggplant parmigiana; Roy and I don't like eggplant, so this dish usually goes to his mom. Then I saw a recipe on Facebook that used eggplant as the top and bottom of a sandwich type appetizer/main course item with spaghetti and sauce as the filling. While the photo looked pretty, I truly didn't see the point of it; but it did get my mind going into a creative direction.

To the refrigerator I went to look for ingredients that would work with the eggplant; Roma tomatoes and mozzarella cheese, but then I spied the chicken cutlets I had defrosted for another recipe.  Suddenly the picture of the recipe I was to make came into my mind like little photos, and I was off!  The eggplant would be the base ingredient, just as bread was for bruschetta; olive oil, garlic, , Italian herbs, tomatoes and cheese were a given.  The chicken, however, would give the entire dish a new dimension in flavor and texture; this would be one of those recipes that could be an appetizer or a main meal.

Enough chit chat and lets get to cooking...


Eggplant-Chicken Bruschetta

Ingredients:

1 medium sized eggplant cut into 12 (1/4" thick) slices
3 tsp salt
1 tsp garlic powder
4 Tbsp olive oil, divided in half
1 Tbsp Italian herbal mix
6 pieces boneless, skinless chicken breasts (1/4" thick, cut to equal or slightly larger size than eggplant slices)
6 slices Roma tomatoes
6 slices mozzarella cheese
3 tsp grated Parmesan cheese


Preparation:


Line a platter or baking sheet with paper towels; lay out eggplant slices, sprinkle with salt and cover with additional paper towels.  Wait a minimum of one hour before pressing the paper towels onto the eggplant to remove excess water that has been drawn out by the salt. 


Heat 2 tablespoons of oil, medium-high heat, in a large skillet; place eggplant into skillet, brown one side, turn to brown other side and sprinkle garlic powder over first browned side.  Remove to paper towels.


Put remaining oil into skillet plus herbal mix; place chicken into skillet and brown both sides; remove to paper towels.  Preheat oven to 375F; line a baking sheet with aluminum foil.


Build a stack: eggplant slice, chicken piece, tomato slice, cheese slice, eggplant slice.  When all stacks are made, place on the baking sheet and top with 1/2 tsp of grated cheese.  Bake in oven for 5 to 7 minutes to allow mozzarella cheese to melt.


Makes 6 servings for an appetizer; Makes 3 servings for a meal.

Mary Cokenour

Sunday, August 19, 2012

More to Corn than just the Cob.

Corn is that versatile vegetable that can be used to make a variety of food stuffs such as grits, polenta, tortillas, bread; nevermind side dishes such as corn pudding, succotash or an added ingredient to casseroles. Roasted or boiled on the corn is one of the most popular summer time favorites for a barbequed feast. Don't forget popped corn as a snack for movie watching, but what about as a batter dipped, deep fried goodie. No, I'm not talking about corndogs; I'm talking about corn nuggets.

Creamy, corny goodness encased in a deep fried coating similiar to that on a corndog, but without the meat. I've had them in a restaurant as an appetizer; they can just be a great snack food; or served as a side dish for a simple meal such as burgers, even at a barbeque. While you might be able to find them in the frozen food section of a supermarket, you're better off just making them fresh at home. Give them a try!


Corn Nuggets

Ingredients:


1 (14 ¼ oz) can creamed style corn
1 (14 ¼ oz) can whole kernel corn, drained
¾ cup cornmeal
¾ cup flour
2 egg whites
3 Tbsp milk
¼ tsp each salt
Canola oil for frying

Preparation:

In a small bowl, mix together both cans of corn; line a jelly roll pan with wax paper; spoon tablespoons of mixture onto wax paper and freeze until firm (about 3 hours).

Fill a deep fryer to fill line, or a deep skillet to one inch, with oil; bring temperature up to 350F. While oil is heating, in a medium bowl, mix together cornmeal, flour, egg whites and salt thoroughly. Dip frozen corn into the batter and then deep fry, 4-5 at a time, until golden brown. Remove to paper towels to drain; serve as is or with assortment of sauces.

Makes about 2 dozen.

Options: before freezing, add to corn mixture, ¼ cup of crisp, crumbled bacon; petite diced bell peppers, chile peppers or onions; or a combination of ingredients.

Mary Cokenour


Monday, January 2, 2012

Pizza Dough - There's an App for That.

Now put away those cell phones; I'm talking appetizer, not a networking application. Saturday night, New Year's Eve, we spent with friends Heidi and Sean, their children and another couple. Nothing fancy, just good people getting together to celebrate the end of the old year; and looking forward to lots of laughter. Oh, we laughed and laughed till our sides hurt; it felt great!

Even though it was a small get-together, it was an opportunity to do a little showing off in Heidi's kitchen. No dips or prepackaged appetizers to end the year; I was going to make something yummy to remember. First thing I did was get a 4 quart crock pot of homemade pasta sauce going. Actually, I did that on Friday, so besides having a dipping sauce for my appetizer, I made stuffed shells for dinner that night. No, it wasn't the typical meat sauce I use with stuffed shells, but they came out yummy just the same.

So Saturday rolls around and it was a lazy kind of day. Roy was engrossed in "SkyRim; The Elder Scrolls 5" and I watched reruns of "The Marx Brothers" movies. When it was time to make the appetizer, I was raring to go. I got all the ingredients together in order of preparation; set up the jelly rolls pans and went to work. By now you're wondering, "what the heck are you making anyway?" Thanks for reminding me to tell you...Sicilian Pepperoni Rolls similiar to those served at "Old Chicago".


To get two trays of rolls together, 20 on each, only took about a half hour; they are that easy and quick to make. It takes a lot longer though when someone is carrying one of the trays to the refrigerator and drops it. No Roy, you are not going to be hearing the last of this for a long while. "But it just slipped out of my hands" he says and since I did not see him do it, I can't really say how it happened, but I can imagine. He was doing the Italian accent thing as he carried them and I could picture him carrying the tray one handed like a waiter when suddenly.....all over the floor.

What to do, what to do, since I'm out of pizza dough and off to the store, which was luckily still open, to get a roll of Pillsbury Classic Pizza Dough. It worked out fine and while the Pillsbury dough baked up thinner than my dough, the rolls tasted amazing and the dipping sauce went great with them. There was not one left and Heidi has requested the recipe, so here you go girl.

Sicilian Pepperoni Rolls

Ingredients:

flour
12 oz. homemade pizza dough or 1 canister of Pillsbury Classic Pizza Dough
1 cup olive oil
2 Tbsp Italian herbal mix
1 cup Italian cheese mix
1/2 cup diced pepperoni
grated Parmesan cheese

Preparation:

Preheat oven to 425F. Spray a jelly roll pan with nonstick cooking spray.

Lightly flour a wooden board and roll out the dough to a 14"x20" rectangle; mix the olive oil with the herbal mixture and lightly brush the rolled out dough. Sprinkle the cheese and pepperoni over the oiled dough. Starting at the top edge of dough, carefully begin rolling towards the bottom edge; make sure to keep the roll tight; the oil will help seal the roll.

Cut off a little of the far ends of the roll; cut the roll into one inch pieces. Carefully transfer each cut piece to the jelly roll pan, cut side up. Lightly dab the herbal oil mixture, and sprinkle a little grated Parmesan cheese, onto each piece.

Bake for 15-20 minutes; until dough is golden brown. Remove to serving plate and serve with dipping sauce.

Makes 20 pieces.

Mary Cokenour