Thursday, January 3, 2013

It's Beefy, Eggy and Good Anytime.

Recently I enjoyed an adventure in making a Prime Rib for the first time. Then I did a bit of thinking, yes I do that on occasion, and wondered if the roasting technique I used on the prime rib could be done with other types of beef roasts. Instead of buying cold cuts at the supermarket, I usually roast my turkey and chicken breasts, glazed ham or roast beef; then thin slice them for sandwiches or chopped up for salads.

This time I had a lovely, lean eyeround roast waiting for its turn in the roasting pan.  Leaving out the rosemary and thyme, I only seasoned the meat with the salt, ground black pepper, garlic and onion powders; but cooked it the same way as I had done with the prime rib.  Again, I relied on my meat thermometer to tell me when it reached medium-rare.


Now one morning hubby wanted breakfast and he was thinking along the lines of eggs, bacon and cheese on a toasted roll.  Well he got more than he bargained for, as I like to think and cook outside the box.  You see, I had forgotten to take the bacon out of the freezer for defrosting, but the container holding that lovely roast caught my eye....and the cheddar cheese slices, and the mayonnaise, and the butter.  I never said this was going to be a heart healthy sandwich, but you can always tweak what I'm telling you here to your own needs.  Back to the story....


After slicing open the Kaiser roll, I buttered up the outside top and bottom of the roll, just like I was going to make a grilled cheese sandwich.


Heating both my griddle pan and 8 inch skillet, I opened up 2 eggs which went into the 8 inch skillet.  The Kaiser roll went butter side down on the griddle pan with a smear of mayonnaise on both face up sides.  A slice of mild cheddar cheese also went down over the mayonnaise; while several very thin slices of beef sat on one roll half.  I flipped the eggs over as hubby likes them over easy, let them cook a bit before sliding them on top of the beef.  Now here's the important part, place the cheese only side of the roll over the eggs and press down lightly; you don't want to break the yokes.   Let the sandwich fry for about another minute before moving it to a plate.

 
...and there you have it, the Beef and Egg Anytime Sandwich. Why did I name it "Anytime"? Hubby enjoyed it so much, he wanted one for dinner that night; and then again for lunch on another day.

Be warned though, you will need lots of napkins for this sandwich. Pick it up whole, bite into it and you'll get a gush of egg yolk all over your face and hands. Cut it in half, pick it up and the egg yolks will still get on you. However, once you taste it, you won't care the slightest. The crunch of the butter fried roll, the smooth melty cheese, seasoned beef enriched with the mayonnaise intertwined with yolky goodness. Yes, you will think, this is nirvana!!!

Enjoy!

Mary Cokenour
January 3, 2013

Wednesday, January 2, 2013

Rolling into the New Year of 2013

...with Pumpkin Roll. That's right, we're starting this food blog off with another dessert made with pumpkin. Technically we're still in the holiday season, and pumpkin does start off the season in October when the jack o'lanterns come out for Halloween. For the 2012 holidays, we also made Pumpkin Chocolate Chip Cookies, Pumpkin Bread, and Pumpkin Pie, so lets finish off the season and start the New Year with some cake.

Making a rolled cake takes patience, and a batter that produces a cake which is not too firm, but not crumbly either; you need it to be pliable without falling apart.  You also need a jellyroll pan (a 15"x10"x1"); it sort of looks like a rectangular baking sheet, but with an edge around it. The name comes from the original cake that was made in it; a thin yellow cake with a fruit jelly spread onto it, then rolled...the jellyroll cake.   Another popular jellyroll style cake is made with a dark chocolate cake and a white cream filling, or what is typically called the Swiss roll cake.  With this cake, there is the option of giving it a coating of chocolate or not.

Definitely use wax paper with this cake, not parchment paper, as it will peel off much more easily.  Also, use a lint free linen towel to help with the rolling; nothing is more unappetizing than to find cloth fibers in your cake or filling.  Thirdly, make sure you give yourself room to work like a large area of counter space, or even a table.  So lets get to it....


Pumpkin Roll

Ingredients:

1 tsp each ground nutmeg and cinnamon
½ tsp each ground cloves and ginger
1 cup sugar
3/4 cup flour
1 tsp baking powder
1/8 teaspoon salt
3 eggs
3/4 cup canned pumpkin
1 cup plus 2 Tbsp confectioners' sugar
1 package (8 oz) cream cheese, softened
3 Tbsp butter, softened
1 tsp pure vanilla extract
Confectioners' sugar to sprinkle over finished cake

Preparation:

Preheat oven to 350°F. Spray a15x10x1-inch baking pan (jellyroll pan) with nonstick baking spray; line pan with wax paper and spray paper. In a small bowl, mix together spices. Mix sugar, flour, baking powder, 2 and ½ teaspoons of spice mixture and salt in large bowl. Beat in eggs and pumpkin until well blended and smooth; spread evenly into pan.

Bake 15 to 20 minutes or until toothpick inserted in center comes out clean. Place clean linen towel on kitchen counter or table; dust with 2 tablespoons confectioners' sugar. Loosen cake around sides of pan with sharp knife. Turn out onto towel, wax paper-side up (do not remove wax paper); fold side of towel over one short side of cake, and then roll up cake jelly-roll style. Cool cake completely.

Beat cream cheese, 1 cup confectioners' sugar, butter, vanilla and remaining half teaspoon of spice mixture in medium bowl until well blended and smooth. Unroll cake onto towel; peel off wax paper and spread cream cheese mixture evenly over cake. Using towel, roll up cake and place seam-side down on serving platter. Trim ends of cake. Refrigerate 1 hour or until ready to serve. Sprinkle cake with additional confectioners' sugar just before serving.

Makes 12 servings.

Mary Cokenour
January 2, 2013

Monday, December 31, 2012

Spoil Yourself with Shari's Berries

                                                     Shari's Berries


Website: http://www.berries.com/

For my birthday, December 26th, my hubby spoiled me by sending me a full dozen of Shari's Berries Gourmet Dipped Fancy Strawberries.  I've seen the commercials often and wanted to try them, and now was the time.  They are delivered by UPS truck and come in a styrofoam lined box with freezer pack to keep them fresh.  The box itself is beautiful, but the strawberries win the prize for beauty and taste.

Each strawberry was large, red, ripe and delicious.  After biting into one, the juice would dribble down the chin, so have your hand ready to catch it all and yes, you will want to lick it clean.  The chocolate covering is thick, yet delicate, so be ready to catch any pieces that fall.

Besides the strawberries, Shari's website offers chocolate covered cherries and pretzels; cheesecake and cookies (with or without a chocolate coating).  They even have Zoo Animal Cake Pops to light up any child's eyes and taste buds.

Shari's Berries offers specials for every occasion and holiday.  There is a rose bouquet of chocolate covered strawberries that would win any woman's heart on Valentine's Day; or man's if so inclined.  However, something tells me that Roy and I might just be making up any old reason to order from Shari's, and we certainly plan on sampling all the other goodies offered.

Be good to yourself and/or someone special in your life for the New Year of 2013, and order a little something something from Shari's Berries.....you're worth it.

Happy New Year's to All from the Cokenour Family.


Saturday, December 29, 2012

My Holiday Adventure with a Prime Rib.

Enjoying a finely roasted slice of Prime Rib Roast is not something new to me. I have eaten them at many a wedding reception, or on a special occasion at a restaurant. However, I was not brave enough to consider making it on my own; it's an expensive cut of beef, I was so afraid of messing it up or that it would be too difficult. That was then, this is now and I'm a lot braver than I used to be, especially in the kitchen. Since the winter holidays were upon us, what better way to show off my bravery, but then to make a Prime Rib Roast. I shopped around and found lovely specimens of this beef type; one to make for me and my hubby; one for his mother and brother to enjoy. Now the big question was, what do I do with them? To the internet!!!

Into my Google search box I typed, "how to roast a prime rib?" and thousands and thousands of sites popped up; I stuck to the first 10 on the first page.  I could not believe I actually found a forum set up for discussing prime rib and almost each person had their own way of doing it.  Of course each person also stated that their way was the perfect way, and no other method could compare.  In an hour I had come up with my own cooking and seasoning methods.  How you ask?  I used averages and majority rule; I averaged out the cooking temperatures and times; figured out which seasonings people used the most and threw in my own touches to make it all mine.  Ok, here comes the bragging.....out of all the prime rib dinners I have eaten in my lifetime; mine is the absolute best I've ever had.  There, I've said it and will say it again; my prime rib is the absolute best!!!

So lets get to the perfection...

 
How to Make a Prime Rib Roast
 
 
Normally a prime rib roast comes with the bones attached.  You can do several things with the bones once removed; use them as a rack for the roast to rest on while roasting; cook them separately to eat later on; use them to make beef stock.  Or you can ask your butcher to remove them for you and not deal with them at all; to me, that's a complete waste.  Prime rib usually comes with a thick fat cap also; I removed a good portion of it so I could get the seasoning rub onto the meat itself, but left enough fat so the meat could self baste while roasting.

Ingredients:
 
1 (14.5 oz) can beef broth
1/2 can of water
4 large shallots, peeled and split into sections
2 tsp dried rosemary
3 tsp dried thyme
1 tsp garlic powder
1 tsp onion powder
1/2 tsp ground black pepper
1 tsp coarse sea salt
2 Tbsp olive oil
8 lb prime rib; bones removed

Preparation:


Preheat oven to 400F.  Line a roasting pan with aluminum foil; pour the beef broth and water in.  Place the shallot sections in the pan so that the prime rib will be located over them.  Spray the rack with nonstick spray and place into the pan; be careful not to tear the foil.


Mix together the rosemary, thyme, garlic and onion powders, black pepper and salt.


Brush olive oil over top of the prime rib; spread seasoning rub onto it.


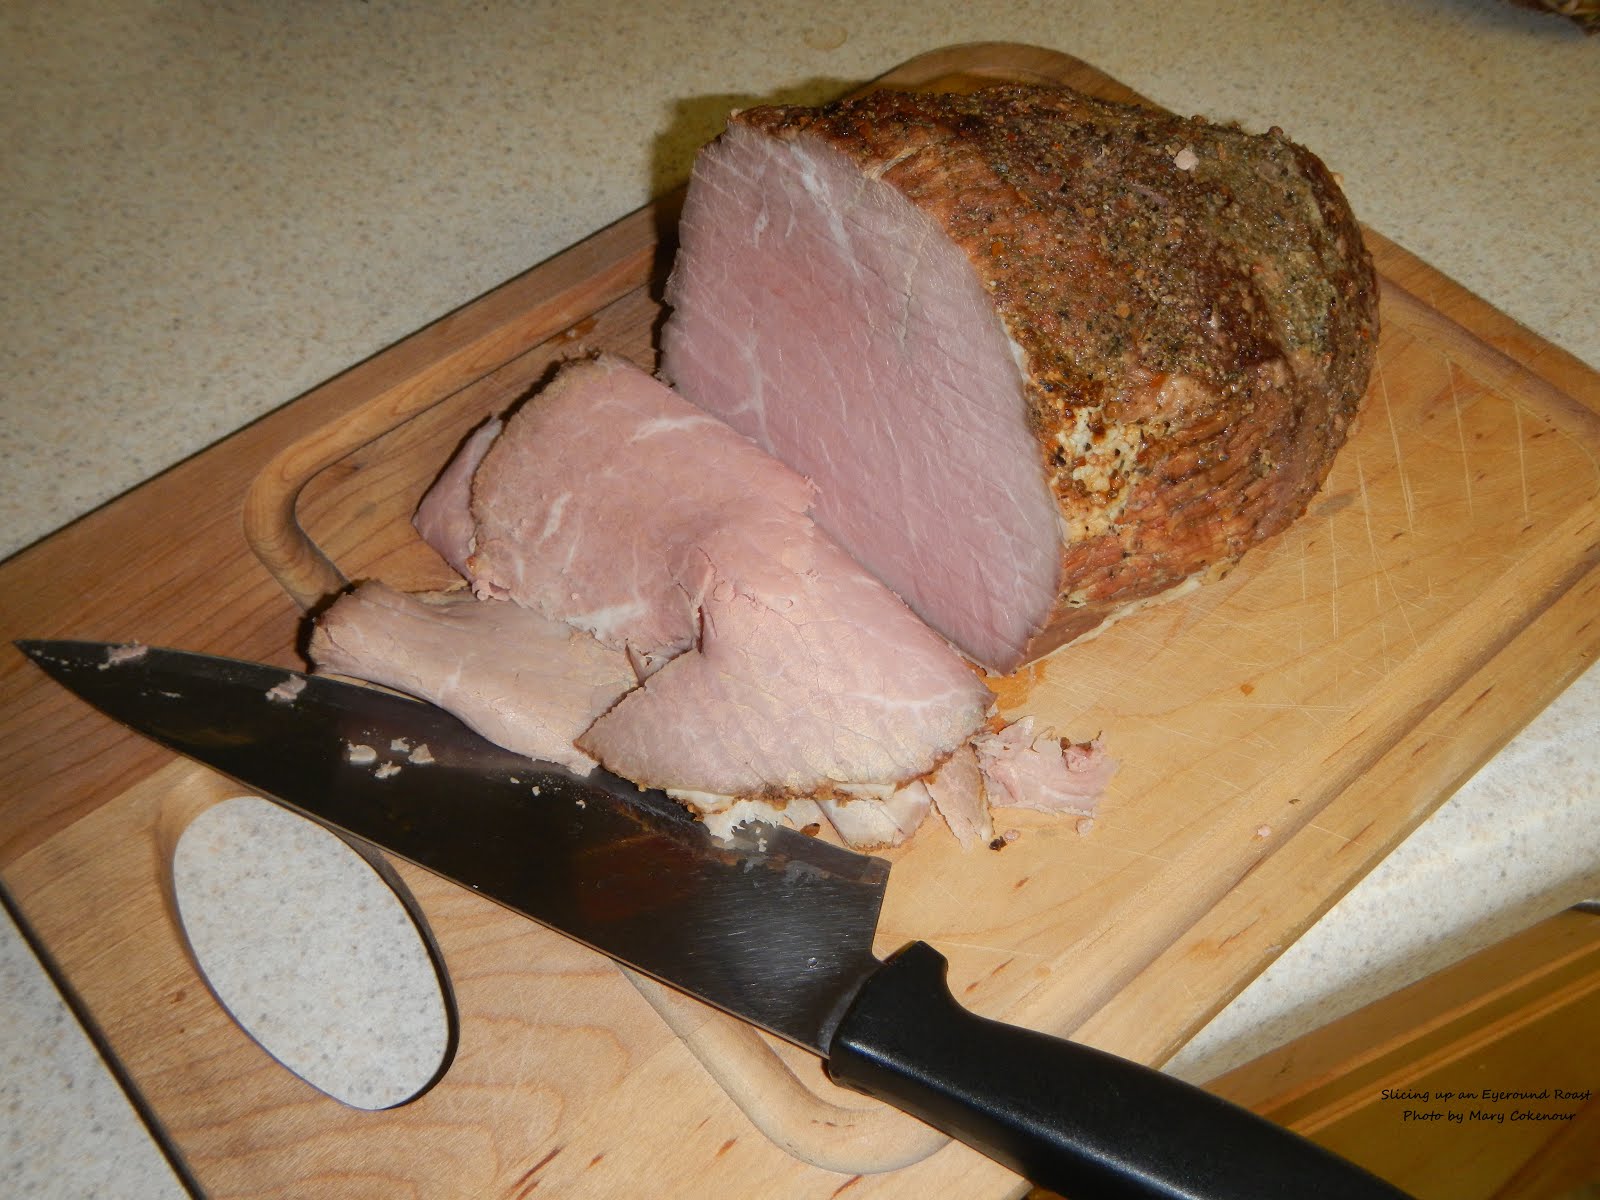
Place the roast onto the center of the rack; make sure it it over the shallots.  Roast the beef for 45 minutes at the 400F temperature; turn the temperature down to 300F and roast to desired doneness.  A meat thermometer is going to be your best friend with this process as it will tell you the internal temperature and, therefore, how you like your meat cooked.  125F is rare, 135F is medium-rare, 145F is medium and 155F is well; anything over that, in my opinion of course, is shoe leather. In the words of Doctor Who, it's a "wibbley wobbley, timey wimey" process.


Once you have the roast at the desired doneness, pull the entire pan out of the oven and let it all rest for 30 minutes.  This lets the juices from the roast redistribute back throughout itself; then place the roast on a cutting board and cut one inch slices.


You're probably wondering about the beef broth, water and shallots?  This is what you'll use to make either an au jus or a gravy; first remove the shallots with a slotted spoon.  Then pour all the remaining liquids and solids into a freezer safe plastic bowl; put the bowl into the freezer for 45 minutes; the fat will rise to the surface, solidify and you can just remove it easily with a spoon.  Pour the fat free liquid through a strainer to remove any bits of missed solid fat or herbs.  That will give you a lovely clear, herbal flavored au jus; or you can put the liquid into a saucepan, add a tablespoon of corn starch, bring it to a boil and make a gravy.  The shallots?  I chopped them up finely and added them to the au jus, but they could just as well be served on the side of the prime rib slice.

Now what did I do with those rib bones?  Glad you asked. 


I seasoned them up a bit differently by using my all purpose seasoning rub .  After the prime rib was done, I popped them into the 300F oven, sitting on an aluminum foil covered rack in a pan; I let them roast for 3 hours.


They made a good snack for my hubby later on.


In essence, fear is the appetite killer; take the plunge and make something that you thought could only be found at a good restaurant or a banquet hall.  New Year's Day is just around the corner, so make the resolution to treat yourself well and keep it.

Happy Holidays!!!

Mary Cokenour

Thursday, December 20, 2012

Semi-Homemade Caramel Apple Cake.

As much as I enjoy making recipes from scratch, there are those times that I want to cut corners too due to time constraints or just plain old laziness.  Now usually for the holidays I make dozens of different types of cookies and give them out.  Oh don't worry, I keep a good amount for us too.  However, this year I'm not able to do this because I had carpal tunnel surgery done on my left hand.  If you don't know what this means, basically a nerve in my wrist began to become compressed from repetitive work; for me it was from working with computers.  It begins with a tingling in the thumb, index and middle fingers gradually progressing to numbness to the point of not being able to feel something you are holding.  It also can be accompanied with severe pain in the hand, wrist and radiating up to the elbow.

Anyway, it takes about 4-6 weeks for complete recovery and you have to use the hand minimally which means no heavy lifting.  The bowls I use for my baking are of a heavy ceramic and definitely need two hands for handling them when they are full of batter or dough.  It's been 4 weeks now since the surgery and I have no intention of having a holiday dinner without some sort of dessert.  So, what to do, what to do?  Basically, do it semi-homemade, so it is as easy to manipulate and handle as possible; my right hand could still do all the work while my left hand kind of just went along for the ride.  While my right hand did all the grunt work, l let my lower left arm and inside elbow cradle the bowls; it still hurt a little, but my left hand didn't have any pressure on it.

Lets get to it then; to make it especially easy, I used a Super Moist Yellow Cake mix; but remember, this recipe is semi-homemade, so don't hesitate to use your own cake batter if you prefer.  Yellow cake mix can also be bland, so I umpted up the flavor intensity by adding apple pie spice mix and a bit of ground ginger.  You could also think of this as a type of "upside down" cake where the toppings are baking in the pan underneath the cake layer, but when you flip the finished cake out, you see all the lovely apples and caramel.

Caramel Apple Cake
 
Ingredients:
 
For the Caramel Layer:
 
8 Tbsp butter, melted
1 tsp pure vanilla extract
4 cups brown sugar
1 Tbsp ground cinnamon
 
For the Apple Layer:
 
1 (21 oz) can apple pie filling
 
For the Cake Layer:
 
1 box Super Moist Yellow cake mix
1 tsp apple pie filling
pinch of ground ginger
 
Preparation:
 
Preheat oven to 350F; spray two 9 inch cake pans with nonstick baking spray.  Cut out two circles from parchment paper to line bottom of cake pans; spray the paper with the nonstick baking spray.
 
In a medium bowl, mix together the ingredients for the caramel layer until it resembles coarse crumbs. 
 
Divide the mixture up between the two pans pressing to the edges and 1/4 inch up the sides. 
 
Divide the pie filling between the two pans, spreading it out up to one inch from the edges.
 
Prepare the cake mix according to packages directions, but add in the apple pie spice and ground ginger.  Divide the batter up between the two pans and use a spatula to smooth it out.
 
Bake for 35-40 minutes; cake will be golden browned and you might see some of the caramel oozing up the sides of the cakes.  Remove pans to a wire rack and let cool for 10 minutes.
 
When cooled, use a hot knife around the edges to make sure the caramel will not stick to the sides of the pan.  Carefully flip the cakes onto a serving plate and peel off the parchment paper.  Cut into 8 wedges and serve with a scoop of ice cream.
 
Makes 2 cakes, 8 servings each.
 
Mary Cokenour


Sunday, December 16, 2012

Cookies of Hard Packed Snow.

For two days we had snowfall here in Monticello, Utah. Now anyone who lives in an area that has snowfall has, at one time or another, did the classic stick out the tongue and try to catch snowflakes on it. Come on now, you know you have, especially when you were a child, and I bet you still try it out as an adult. What about making a snowball and putting it in the freezer? Then when summertime came, you looked for it planning to surprise someone when they get hit with it?

When it comes to "eating" snow, the first thing you might think about is the snow cone; shaved or pulverized ice with flavoring poured over it and served in a paper cone. There is a particular type of "cookie" though that you can place in your mouth and let it melt into sugary goodness; or you can mash it up to use as a topping and it will resemble snow. That cookie is called a meringue; made mostly from egg whites and sugar, then baked in the oven at a very low temperature before letting it finish off as the oven cools. Meringue cookies can be made in a vast variety of color and flavor combinations; eaten as is, used as a garnish, even tweeked into a cake called a "Pavlova" which is then topped with whipped cream and fresh berries.

If you're worried about the amount of sugar needed to make meringue cookies, don't! The Splenda brand of sugar substitute and the natural herb Stevia can be used instead; while one cup of Splenda equals one cup of sugar, only one teaspoon of Stevia equals one cup of sugar. You'll also have to use a higher temperature for the baking part of the recipe; basically it's 225F for sugar, 300F for Splenda and 350F for Stevia.

 
Meringue Cookies

This is going to be a basic recipe for vanilla meringues; you can make different flavored meringues by substituting other flavored extracts for the vanilla. If you want chocolate meringues, add a tablespoon of unsweetened cocoa powder; also add one cup of mini chocolate chips for a double chocolate experience.   To make colored meringues, use drops of food coloring; for example, a few drops of red for pink meringues, but add strawberry extract for that extra flavor boost.   When adding items such as mini chips or shredded coconut, gently fold into the stiffened egg whites so as to not break them.

Ingredients:

4 egg whites
1/2 tsp cream of tartar
1 cup sugar
1 tsp pure vanilla extract

Preparation:

Preheat oven to 225°F.

Beat egg whites in large, clean, metal bowl with electric mixer on medium speed until frothy; add cream of tartar and beat until soft peaks form. Increase speed to medium-high; add sugar, one tablespoon at a time, beating until sugar is dissolved and stiff peaks form.

Drop by rounded teaspoons about one inch apart onto two large baking sheets sprayed with nonstick baking spray; or use a piping bag with decorative tip to form cookies as they are piped onto the baking sheets.

Bake both sheets of meringues for 45 minutes; turn oven off. Leave meringues in the oven for one hour, or until completely cooled. Amount will depend on size of meringues being made; typically 6 dozen if dropping by teaspoon full.

Mary Cokenour

Wednesday, December 12, 2012

Eating for Good Luck in the New Year.

When I lived in Lancaster, Pennsylvania, we celebrated the New Year by going to one of the local churches and feasting in a family style, all you can eat, Pork and Sauerkraut meal.  This tradition came to Pennsylvania with the Amish and the Mennonite; a German or "Pennsylvania Dutch" tradition to bring good luck for the incoming New Year.

Once I moved to Utah, I found there was no typical New Year food tradition; no reason behind it, there just wasn't one is what I was informed.  Oh I went online and tried looking it up; found the Pennsylvania one, a Deep South tradition, even listings for the Chinese New Year, but no, no traditional Utah one, not even Mormon related.

The recipe I'm posting today deals with, of course, Pork and Sauerkraut; and finding the origin of this combination goes back to; well good question as pickled cabbage can be found in many cultures, even the Chinese.  My personal recipe is more of Croatian descent, except I add potatoes like they do in Germany; in the Ukraine, they add barley; however I have had one woman of Irish descent tell me that the idea of adding potatoes was stolen from the Irish.  Wherever it came from, the concept is still the same, eating it on New Year's Day to ensure good luck, good health and prosperity all year long.

I like using sauerkraut that is from a jar or a bag; it tastes better and the canned variety seems to have a metallic taste to it.  When it comes to the pork, you have lots of options; smoked kielbasa or sausage, roasted pork roast, fried or baked boneless pork chops; you can add bacon or ham too.  My recipe is a quick stove top dish, so make sure the pork product you use is cooked before hand.

 
Pork and Sauerkraut


Ingredients:
2 Tbsp olive oil
2/3 cup diced red onions
8 baby potatoes, peeled, parboiled and cut into 1/4 inch slices
2 cups sauerkraut, drained
1 (14 oz)smoked sausage, cut into 1/4 inch slices
1 Tbsp paprika
1 tsp caraway seeds

Preparation:


Heat the oil in a large skillet, medium-high heat; add the onion and potato slices and cook until onion begins to soften. Turn potato slices occasionally to keep from over browning.


Add the sauerkraut and sausage slices; when the ingredients begin to sizzle, mix thoroughly. Let cook another five minutes before mixing in the paprika and caraway seeds. Continue to cook another three minutes, but check to see that nothing is browning or drying out too quickly.

Makes 4 servings.

Mary Cokenour