Showing posts with label dessert. Show all posts

Wednesday, June 18, 2025

More to S’mores.

Did you ever read one of those survey questions that asked, “How old were you when you found out about ______?”  Well, here’s one for me, “How old were you when you had your first s’mores?” I was 52 years old and at a cook out at a friend’s home.  After the main meal, they called the children together and said, “OK kids, time to make s’mores!”, and I had to ask what they were.   Oh, I can feel eyes going wide, confusion on the face, and, “She’s never had s’more before!?!”, and that answer is “No”.

With summer almost here, camping and barbecuing will be in full swing, and it seems that s’mores is a big deal west of the Mississippi.  Any stores selling food products already have a display of boxes of graham crackers, bags of large marshmallows, and packs of Hersey milk chocolate bars.  Oh, and here a rant from me; I remember when those Hersey bars were sold in packs of six, and now they are only in packs of four!  Outrageous!!!

Origin of the s’more seems to have begun on the east coast, but not exactly how it looks right now.  I remember, when we had overnights at camp, the only things we roasted over the campfire were hot dogs and large marshmallow on sticks we collected from trees.  The combination of graham cracker, marshmallow and chocolate came in a yellow package, sold in the cookie aisle, and were called “Mallomars”.  Family Dollar sells a similar cookie, “Eatz Fudge Marshmallow Chocolate Cookies”, that name long enough for you?  Anyway, the cookie has a graham cracker round, marshmallow on top, and the entire cookie is drenched in chocolate.  Sounds like what you all probably know as s’mores, right?

Another product that is similar to s’mores is the “moon pie”.  Moon Pies originated in Chattanooga, Tennessee in 1917 at the Chattanooga Bakery. The story goes that a traveling salesman, Earl Mitchell, was inspired to create the snack after talking with Kentucky coal miners who wanted a large, filling treat for their lunch breaks. The miners suggested the snack be "as big as the moon," leading to the moon pie's name and size; and is still a popular treat in the south.

Ah, but who invented the s’mores that is popular around campfires?  In 1927, girl scout leader Loretta Scott Crew, was given credit for creating the recipe, for her troop.  She gave it the name “Some More”, and published the recipe in the Girl Scout handbook, “Tramping and Trailing with the Girl Scouts”.  The recipe retained its name for about 50 years before it was reduced to “s’mores”.  According to Colorado State University, the recipe name, either version, signifies that, after eating one, there is a strong desire for another.  Sounds a bit like Oliver Twist, “Please, sir, I want some more.”.


Now I am going to go one better on the simplistic s’more, and offer up a recipe for a complete dessert, S’mores Brownies.  These brownies can be created entirely from scratch, or semi-homemade using a fudge brownie mix.  Personally, I cheat and go the semi-homemade route, using the directions for cake-like brownies.  Even though the box states, for high altitude, “no change”, I still add three tablespoons of flour, or the center remains too gooey and sinks.  If you prefer, and have a fabulous homemade brownie recipe, then use it!


S’mores Brownies

(semi-homemade recipe for cake-like brownies)

Ingredients:

 1 (16.3 oz.) box of Betty Crocker Fudge Brownie Mix

2 Tbsp. water

½ cup vegetable oil

3 large eggs

Optional and for high altitude, add 3 Tbsp. all-purpose flour

9 graham crackers; four of the crackers should be broken up into dime-size pieces.

2 cups mini-marshmallow

3 (1.55 oz.) bars of Hershey Milk Chocolate, each small piece broken into halves

Preparation:

Preheat oven to 350F.  Lightly spray a 9”x9” baking pan with nonstick spray, then place 1-8”x12” piece of parchment paper long-ways across pan, turn pan and place a second piece of parchment long-ways again.  Crease paper along bottom edges of the pan; this will make removing the brownies much simpler, and help keep them from falling apart when moving to a platter. 


At the bottom of the pan, lay out five graham crackers, breaking pieces off to make them fit side by side, and cover the bottom.  Mix together brownie mix, water, oil, eggs, and extra flour if needed, and pour over the graham crackers, making sure to spread out evenly and smoothly. Place pan in oven and bake for 32 minutes, remove and set on towel or hot pad.


After 32 minutes, 350F.


On top of the, not completely baked, brownies, spread out the broken-up graham crackers.  Next, spread the mini-marshmallows, and last, but not least, spread out the broken-up Hershey bars.  Place back into the oven for another five minutes; the chocolate will get melty, and the marshmallows will begin to spread a bit, and slightly brown.


Remove pan from oven and let brownies cool for 15 minutes before removing from pan.  Carefully lift by the edges of the parchment paper and set onto a platter; carefully, using a long spatula, lift each side of the brownies and remove the paper.  To cut the brownies, use a very sharp knife as the graham cracker crust is still crispy; it does not soften up from the batter’s moisture.


Servings are 12 to 15, depending on how large they are cut.
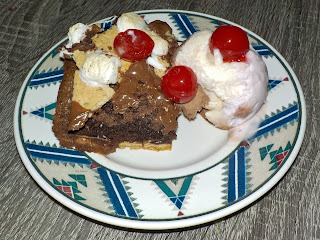
 

Make it a complete dessert with ice cream and maraschino cherries.

There you have it, more to s’mores than you knew before.  Enjoy the sweet pleasure.

Mary Cokenour 

Wednesday, December 11, 2024

An American Culinary Blunder.


Candy Cane Fudge, Chocolate Mint Fudge, Divinity Candy

From experience, coming up with recipes in the mind, figuring out ingredients and putting it all together can be either delicious success, or “what the heck was I thinking!” failure.  However, once in a great while, a recipe seeming to go wrong ends up creating an amazing yummy mistake.

Take, for example, the origin of the smoothly decadent candy known as Fudge.  When someone exclaims “oh fudge it!”, the word fudge is substituted for the naughty “f” word.  The term “fudged” refers to the failure to successfully complete a goal, the act of cheating, or substituting something that eventually completes a goal, just not the way originally intended.

Fudge is a completely American mistake from the 19th century.  While its origin seems to have occurred in the 1880s, the name of the confectioner who made the mistake is not known.  However, he, somehow it was known he was a he, was attempting to cook up a batch of French style caramels to sell for Valentine’s Day.  However, he ended up overcooking the ingredients which resulted with a smooth creamy confection that became known as fudge.  Why the name fudge?  Cause he fudged it! (insert canned laughter, and snorting equal to a face palm)

One of the earliest written accounts of making fudge was from Emelyn Battersby Hartridge, a student at Vassar College, in Poughkeepsie, New York.  In 1886, she cooked up 30 pounds to be sold at a college auction.  Later on, it became a trend for women attending college to cook up pots of this sweet treat, in their dorm rooms, whether rules allowed or forbade, it did not matter.

By the 20th century, fudge had become so popular that the recipes were being shared overseas in countries like England, Scotland, Wales and even France. Of course, since it was a mistake in crafting French caramels that created fudge, the French call the two confections, “cousins”.

So, how exactly is fudge made? Fudge is made with sugar, milk or cream, butter and added flavorings, the most popular being chocolate.  The base for fudge is boiled until it reaches the soft-ball stage (135 to 140 degrees F), then stirred or beaten as it cools to minimize the formation of sugar crystals. The result is creamy and smooth semi-soft, yet dense, texture, but a hint of sugar crystals is not a bad thing. After cooling, it is usually cut into slabs or bite-size squares.  While boiling, no matter how much you want to, do not stir the mixture until it reaches the soft-ball stage.  Otherwise, it will become a grainy mess of crystallized sugar.

Making fudge from scratch is a time-long process, so, of course, dessert companies, and home cooks, came up with easier ways. Three brand name companies, Carnation, Nestle and Eagle Brand simplified fudge making by introducing sweetened condensed milk into their recipes. Only trial and error will tell you which recipe is good, better and best. 

Kraft Jet-Puffed Marshmallow Crème has a recipe on the jar label for fudge, so it is not just for making the classic “fluffernutter” sandwich.  The original recipe for “Fantasy Fudge” contains walnuts, but another nut can be used, or leave them out altogether.  Use the recipe as a basic guide and experiment with other types of add-ins.

Fantasy Fudge

Ingredients:

3 cups white sugar

¾ cup butter or margarine

⅔ cup evaporated milk

1 (12 oz.) bag semisweet chocolate chips

1 (7 oz.) jar marshmallow creme

1 cup chopped walnuts

1 tsp. vanilla extract

Preparation:

Gather all ingredients.

Grease a 9x13-inch pan.

Mix sugar, butter, and evaporated milk in a large, heavy saucepan over medium heat, stirring to dissolve sugar. Bring mixture to a full boil and cook for 5 minutes, stirring constantly.

Remove from the heat and add chocolate chips; stir until chocolate chips are melted and mixture is thoroughly combined.

Stir in marshmallow creme until incorporated. Mix in walnuts and vanilla.

Transfer fudge to the prepared pan and use an offset spatula to spread out and flatten.

Let cool for at least 1 hour before cutting into squares.

Yield: 3 pounds.

Luckily, if candy making is not your thing, fudge is offered, for sale, in various candy shops across the nation, and Utah is no exception.  A few retailers that offer online sales: Wasatch Fudge, Fudge Co., Brittles & Fudge, Startup Candy Company, Fernwood Candy, and the list goes on.  If you live in an area that has an authentic candy shoppe, and most specially creates their own inhouse, then consider yourselves very blessed in the sweet tooth department.

Now what candy is called fudge, is not a fudge at all, but its taste as been likened to the divine?  Divinity fudge is actually a candy with a texture closer to Turkish Delight, marshmallow or a very soft nougat.  Its origin, well the first appearance of a recipe, can be traced back to 1902 and the Corn Products Refining Company with their introduction of Karo corn syrup.  Supposedly the taste was said to be “Divine!”, and the name stuck.  This candy is made by cooking sugar and corn syrup together until firm, then beating egg whites into it.  Add-ins can be nuts, chocolate, coconut, and candied fruit, but since pecans are the most popular, it is often called “Southern candy”.  Replacing white sugar with brown sugar, plus adding vinegar and baking soda, results in a confection called "sea foam"; a crunchy, airy candy similar to meringues.

Will fudge be on the holiday sharing list this year?  Only Santa Claus knows for sure.

Mary Cokenour


Wednesday, December 4, 2024

Time to Plan the Holiday Sweets.

It is December 1st as I am writing this and, being the ultimate holiday month, time to plan out what sweets to make for sharing.  Correct, for sharing.  Each year I endeavor to make enough treats to give out to those who have provided services throughout the year.  There are also the folks that Roy and I have friendly relationships with, and want to show our appreciation for having them in our lives. 

So, I will be giving you recipes for two treats that may, or may not, make the giving list this year.  All depends on my mood; the effort is always worth it though.

“Shoo, fly, don't bother me,

Shoo, fly, don't bother me,

Shoo, fly, don't bother me,

For I belong to somebody.”

This song has two origin stories, first sung by Civil War soldiers during the 1860s; secondly in 1898 by soldiers during the Spanish American War.  Both related to the swarm of flies and mosquitoes during the hot, humid summer months.  The two versions, which happened to include the “N” word, were eventually tamed down throughout the 1900s and became, oh you guessed it, a nursery rhyme.

In Pennsylvania Dutch cooking, there is a pie that would put anyone in a diabetic coma; that pie is called "Shoo Fly".  The name originates from the bakers having to "shoo" flies away from the pie, since the little buggers were very attracted to the molasses and sugar that are the two main ingredients.  "Shoo Fly" is a dense, sticky pie; extremely sweet and definitely an acquired taste.  It is best served warm with a scoop of ice cream, usually vanilla, on the side; strangely enough, the ice cream mellows out the pie's sweetness.  I did make this for a holiday party once, and it was said to be similar to pecan pie, but without the pecans, and much gooier and sweeter.


Shoo Fly Pie

Ingredients:

Filling

1 and ½ cups molasses

1 and ½ cups warm water

1and ½ tsp. baking soda

Topping

4 cups flour, sifted

2 cups sugar

½ cup brown sugar

½ cup butter, melted

2 (9 inch) deep dish pie crusts

Preparation:

On low heat, in a deep saucepan, cook together the molasses and water for 10 minutes; do not let the liquid boil.

While liquid is warming, preheat oven to 375F; cover center rack with aluminum foil in case of dripping (and it usually does). In a large bowl, combine the flour, sugar, brown sugar and melted butter to form loose crumbs.

Add the baking soda to the liquid mixture; it will become frothy; stir well to dissolve all the baking soda. Divide the liquid between the 2 pie crusts; divide the topping between the two, slightly pressing some of the crumbs into the liquid. Bake for 10 minutes; reduce heat to 350F and finish cooking pies for 35 minutes; let pies cool slightly before serving.

Serving suggestion: while still warm, serve with a scoop of vanilla ice cream.


Makes 8 servings.

While we did have a bit of snow for the Thanksgiving holiday, snow for the December holidays is purely magical. Anyone who lives in an area that has snowfall has, at one time or another, did the classic stick out the tongue and try to catch snowflakes on it. Come on now, you know you have, especially when you were a child, and I bet you still try it out as an adult. What about making a snowball and putting it in the freezer? Then when summertime came, you looked for it planning to surprise someone when they get hit with it?

When it comes to "eating" snow, the first thing you might think about is the snow cone; shaved or pulverized ice with flavoring poured over it and served in a paper cone. There is a particular type of "cookie" though that you can place in your mouth and let it melt into sugary goodness; or you can mash it up to use as a topping and it will resemble snow. That cookie is called a meringue; made mostly from egg whites and sugar, then baked in the oven at a very low temperature before letting it finish off as the oven cools. Meringue cookies can be made in a vast variety of color and flavor combinations; eaten as is, used as a garnish, even tweaked into a cake called a "Pavlova" which is then topped with whipped cream and fresh berries.

If you are worried about the amount of sugar needed to make meringue cookies, do not fret! The Splenda brand of sugar substitute and the natural herb Stevia can be used instead; while one cup of Splenda equals one cup of sugar, only one teaspoon of Stevia equals one cup of sugar. You will also have to use a higher temperature for the baking part of the recipe; basically, it is 225F for sugar, 300F for Splenda and 350F for Stevia.


Meringue Cookies

This is going to be a basic recipe for vanilla meringues; you can make different flavored meringues by substituting other flavored extracts for the vanilla. If you want chocolate meringues, add a tablespoon of unsweetened cocoa powder; also add one cup of mini chocolate chips for a double chocolate experience.   To make colored meringues, use drops of food coloring; for example, a few drops of red for pink meringues, but add strawberry extract for that extra flavor boost.   When adding items such as mini chips or shredded coconut, gently fold into the stiffened egg whites so as to not “break” them.

Ingredients:

4 egg whites

1/2 tsp. cream of tartar

1 cup sugar

1 tsp. pure vanilla extract

Preparation:

Preheat oven to 225°F.

Beat egg whites in large, clean, metal bowl with electric mixer on medium speed until frothy; add cream of tartar and beat until soft peaks form. Increase speed to medium-high; add sugar, one tablespoon at a time, beating until sugar is dissolved and stiff peaks form.

Drop by rounded teaspoons about 1-inch apart onto two large baking sheets sprayed with nonstick baking spray; or use a piping bag with decorative tip to form cookies as they are piped onto the baking sheets.

Bake both sheets of meringues for 45 minutes; turn oven off. Leave meringues in the oven for one hour, or until completely cooled. Amount will depend on size of meringues being made; typically, 6 dozen if dropping by teaspoon full.

There you have it, two recipes for holiday sweets, that you may not have heard of, or even tried to make yourself.  Now you have no excuses.

Mary Cokenour

Wednesday, September 18, 2024

Recreating Mormon Sweets from Yesteryear.

The inspiration to go through various cookbooks, dedicated to Utah, was once again due to autumn knocking at the door. Typically, we wait to see if woolly caterpillars will give us any hints as to what kind of winter will be around the corner.  If a few, not too much snow; if an abundance, better make sure the pantry is filled with all our necessities.  This year though, no woolly caterpillars have made an appearance, and that was definitely a first for us.

However, we have noticed something new; those pesky paper wasps have been trying to build hives inside our sheds suddenly.  Then there is the outdoor clowder of cats, and they too have been doing a new behavior; hoarding dry food inside corners of their kitty condos.  Gut instinct is telling us to watch and learn from this, and we believe it is going to be a very snowy winter.

So, back to the pantry and an inventory of what we have, what we are low on, or anything new we wanted to add for more variety.  There was the local farmers’ market to pick up freshly made jams and jellies; and a variety of vegetables for drying and freezing.  For apples, I had already processed several pounds worth into pie filling or dehydrated slices for snacking, or rehydrating for other uses.  Applesauce and apple butter though I purchased as I do have my limitations.

Then the idea struck me, “What did those pioneers from the 1800s do to prep for winter?”  Oh, I have a couple of books for that information, but I wanted to know even more.  So, to the internet I went and found another book I had not seen before.  It was written by Winnifred C. Jardine, and when it came to writing about food, she and I had a little bit in common.  I say little bit as I began writing this food column, for the San Juan Record, in January 2015, so for nine years and nine months.  Time does fly when having fun, and it has been a thrill ride of learning about Pioneer, Native American and Mexican recipes.  I have also enjoyed introducing readers to cooking styles throughout the United States, and cuisines from around the world.

As for Winnifred C. Jardine, she joined the Deseret News in 1948 to help with a "Pioneer Recipes" contest and cookbook as part of the News' centennial celebration. When the food editor position came open the next year, she agreed to do it if she could work from home (gee, just like I do).  She ended up being the food editor of the Deseret News for 36 years.  Besides being the food editor, she wrote three cookbooks, “A Melting Pot of Pioneer Recipes,” for The Daughters of the Utah Pioneers (1972), “Mormon Country Cooking” (1980), and “Managing Your Meals” (1987).

Luckily, I could find a reprint of many of the recipes from “A Melting Pot of Pioneer Recipes”, and two seemed to fit the theme of using food items that were prepped for use later on.  While the first pioneers to reach Utah, in 1847, had only what they could carry in carts; they knew that it was very important to begin gardening, gathering, harvesting and storing.  As the months passed, many others came to Utah bringing supplies, but not prepared for a harsh winter.

Quote: “While the first few companies of pioneers were comprised mostly of New Englanders, other states were sparsely represented, as were Canada, England, Scotland, Wales, the Isle of Man, Scandinavia, Germany, and even Spain and Australia. Within the next five years thousands more from other European countries poured into Zion. And with them came their favorite national recipes.”

Swedish Jam Cake and Apple Candy were two recipes I chose from the reprinted selection.  Now, the thing with older recipes is, trying to make sense of the ingredient list and the preparation instructions.  What the author might have just copied without thinking about it, or took for granted that anyone would make sense of it, is just not so.  For example, while the ingredient list does state “3 eggs, separated”, the instruction to beat the egg whites is not in there.  Oh, a last-minute instruction is “Fold in beaten egg whites”, but how much beaten?  Just till clear and foamy, or until stiff peaks form?  Since the method to add them was “folding”, my experience told me stiff peaks, but a beginner might not know that.

This cake, after baking, is similar to a spice cake, and has a hint of strawberry with each bite.  The cake is also extremely moist, so while the first piece was eaten with a dollop of whipped cream; afterwards, it just was a hindrance to the flavor of the cake.  By the way, if you do not want to purchase buttermilk, simply add one tablespoon of white vinegar to one cup of milk; wait 15 minutes and you have perfect soured and tangy milk for the cake.

The Apple Candy was a huge surprise as it is basically apple flavored Turkish Delight.  To make Turkish Delight, water and cornstarch are boiled with the sugar, while the apple candy uses unflavored gelatin (Yes, they still make Knox gelatin).  The only issue I had was the pan size, it is not stated; a 10” x 6” loaf pan makes the mixture too thick, but an 8” x 8” square pan is just right.  After placing the boiled mixture, overnight, in the refrigerator, the next day was cutting into 8 strips across, 8 strips down for a total of 64 pieces.  Yes, if you would like larger sized squares, cut a lesser number of equal strips.

I let Roy try the first square and he exclaimed, “You made Turkish Delight!”; so, I tried a piece and he was so right.


Swedish Jam Cake

 Ingredients:

1/2 cup butter

1 1/4 cups sugar

3 eggs, separated (beat egg whites to stiff peaks)

Pinch salt

1 tsp. baking soda

1 cup buttermilk

2 and 1/2 cups sifted flour

1/2 tsp. cinnamon

1/4 tsp. cloves

1/2 tsp. allspice

1 cup strawberry jam

Cream butter and sugar; add beaten egg yolks and salt. Dissolve soda in buttermilk. Sift together flour and spices and add to creamed mixture alternately with buttermilk, adding flour last. Beat well and add jam. Fold in beaten egg whites. Bake in greased and floured 8x8-inch pan at 375° F. for 30 to 35 minutes.


Apple Candy

 Ingredients:

2 tablespoons gelatin (2 (.25 oz.) packets)

1 and 1/4 cups cold applesauce

2 cups sugar

1 cup chopped nuts (walnuts, almonds, pistachios or combo are best)

1 Tbsp. vanilla

Soak gelatin in 1/2 cup cold applesauce for 10 minutes. Combine remaining applesauce and sugar and boil 10 minutes. Add gelatin and applesauce mixture and boil 15 minutes longer, stirring constantly. Remove from heat, add nuts and vanilla, and pour into slightly greased pan (8” x 8”). Let set overnight in refrigerator. Then cut in squares and roll in powdered sugar.

Mary Cokenour


Wednesday, July 17, 2024

Keeping It Cool.

Here we are, the middle of July and the temperatures are on the rise.  So, where is that sound that brings out our childhood delight?  “What sound?”, you ask.  It is the jingle, the jingle played by the Good Humor or Mr. Softee truck.  All the kids lining up, at the usual stop, money in hand, to buy soft serve cones, rocket pops, éclair or strawberry shortcake. 

Ah, but where I lived, as a kid, we had one more sound that would get us excited in summer’s heat.  “What sound?”, you ask.  It was the “ding-ding”, no, not “dun-dun”; I am not doing an episode of Law and Order here.  “Ding-ding” of the bicycle bell located on the handlebar, and attached to the bicycle was a freezer on wheels, carrying cherry, lemon, grape and, my personal favorite, chocolate Italian ices.  Getting out a scoop and pleated paper cup, the Italian ice man would fill the cup, pressing down to get the most inside, and then rounding out the top in a mound.  It was sweet, it turned our tongues different colors, you could drink it as it melted inside the cup, but most important of all, it was cold.

What is Italian ice?  Origin, of course, is Italian, but even there it is debated on what region.  Supposedly, it is traced back to ancient Rome and the Apennine Mountain Range which runs through the center of Italy.  Snow was always on the mountain tops, gathered in the warmer months, mixed with fruit, and was a refreshing treat in the sweltering heat.  However, in Sicily, the same claim is made, but the snow came from Mount Etna.  In Rome, it was called sorbetto; in Sicily, it was called granita, and while both used fresh fruit, an added sweetener was also included and that was honey.

Between 1880 and 1924, poverty in Southern Italy and Sicily forced many a citizen, of these regions, to immigrate to America.  Italians became the fifth largest ethnic group in the USA, and the country benefited from their many skills, including culinary.  So, is it any wonder that Italian ices did not become a huge hit, during the summer months.  The cities were crowded, even back then, with street carts, people walking to and from employment, children playing, and others just going through day-to-day existence.  Concrete buildings and cobblestone streets created virtual oven-like conditions with the heat pressing down, and no ventilation.  One could not just go to the local convenience store, open the refrigerated section and grab a “cold one”. 

Nowadays, we take a luxury like this for granted.

Ah, but here came the Italian ice man, with his icy confections keeping cool with block ice.  It was momentary relief, but it still hit the spot.

Italian ice, sorbet and sherbet, are they not all the same product?  Yes and no.  They all, if the manufacturer cares about the quality, use pureed fresh fruit, ice and a natural sweetener like sugar or honey.  However, sherbet adds another ingredient, a dairy product of milk, heavy cream or buttermilk.  The added fat gives the sherbet a smoother texture equating it more to ice cream than an “ice”.  If shopping for any of these in a market’s frozen section, read the labels!  Some have artificial flavors and colors, and lots of sugar added, to fool you into thinking you are eating real fruit.  Chances are, if the product states, “no sugar added”, real fruit which contains natural sugar itself, is your main ingredient.

Can Italian ice be homemade?  You betcha!  Back in the 1990s (aka the late 1900s), Martha Steward did a show on making “granita”, or the Sicilian version of Italian ice.  Of course, she touted it as a very fancy dessert that would “wow your guests”.  Anyway, three basic ingredients are needed: fresh fruit, ice and a sweetener.  When making a citrus flavored ice, an additional tablespoon of freshly squeezed juice will give added flavor, and a zing to the tongue.  Berries can be put into the blender whole, except for large strawberries which should be quarter, and green part removed of course.  Larger fruit should be peeled and also cut up.


Homemade Italian Ice

Ingredients:

3 cups fresh fruit  

2 Tbsp. honey or granulated sugar

3 cups ice (small cubes or crushed)

Option: one Tbsp. freshly squeezed juice of same fruit being used.

Preparation:

In a food processor or blender, blend the fruit, honey or sugar, optional juice, and 2 cups of ice until chunky. Add remaining one cup of ice and blend until completely smooth. Taste to see if more sweetener is necessary.

Pour the mixture into a 9” x 13” glass baking dish and freeze for 30 minutes. Remove dish from freezer and scrape with a fork until slushy. Continue to freeze for another 2 hours, repeating scraping once per hour.

Scoop the ice into dessert cups.  The ice will be of a chunky looking consistency, if a smoother texture is desired, let it sit out for about five minutes.  Warm the scoop slightly and run it over the top of the ice to smooth out the bumps.

Makes 4 cups.

Pioneer Day Weekend celebrations will be here soon, wonder if a vendor will be cooling our tongues down with a nice fruity ice?

Mary Cokenour

Wednesday, October 4, 2023

Trifling Around.

 Welcome Fall, and the beautiful cool weather it has brought.  Soon, the leaves will be bursting with colors of red, orange, yellow, and gold.  Whether driving into the mountains, to be up front and personal, or looking up from down below, the colors are an eye feast.  This is also the time for farmers to be plowing, and seeding, fields for winter wheat.  In other words, it is time for second harvest, the picking, eating, jarring, freezing, or other types of processing the last of the fruits and vegetables.

Of course, if you do not have a home garden to break down, going to local or farmers’ markets might just get a good supply.  Be aware that many of the produce could be on its last leg, and needs to be used up immediately.  Make a list of what items would be beneficial to have during the winter months, and how they should be stored.  Also, think about what might be tasty to cook or bake up too, to eat now, or to store as well.

And so, it came to pass that I was craving one of those quick and easy, no bake, pudding pies.  You know the type, pudding and whipped topping mixed together, spread out into a graham cracker encrusted pie pan, cooled to firmness and oohed-aahed later on.  Right, get the ingredients out, ready to start and then I notice bananas on the counter, very ripe bananas.  Well, I could make banana bread, but I did not feel like baking.  Could just slice them up and add to the pie mixture, and there I sat, stumped.  Or was I?

Sitting in my dish rack was a 2-quart, deep Tupperware container and it started to talk to me.  Alright, it did not really begin talking, but it was giving clues to a delicious idea.  What if I made a dessert, that fit perfectly into that container, was not the typical no-bake, but kind of unique in itself?  Instead of grinding up graham crackers, what if they remained whole, or slightly broken?  What if I used them like I would ladyfingers, when I made tiramisu?  (San Juan Record, November 15, 2017 edition for the tiramisu recipe) In other words, make a trifle!


While the trifle is more associated with England, the name origin is French, trufe, truffe, or truffle.  This referred to a mushroom tuber, melanosporum vitt, which primarily grows in the Provence region, of France, from December to March.  They are difficult to acquire, and quite costly, so, of course, craved by the wealthy.  Wait, what about the candy?  The truffle type candy got its name from the resemblance to the mushroom.  These, of course, are more easily found, are a very sweet treat, and less expensive than the real thing.

The English trifle was an attempt to use up stale cake.  Soaking the cake in sherry, or wine, it was layered, in a glass bowl, along with fruit and whipped cream.  It was a quick dessert to make, and very pretty to serve and eat.  When the English came to North America, recipes came with them.  The trifle became very popular in the South, especially with the fermentation of corn which created various forms of whiskey and bourbon.   A nickname for trifle was "Tipsy Parson" as it was said to have lured many a preacher off the wagon, literally.

Back to the bananas which ended up being sliced, and a component of a lovely trifle.


Trifle


Ingredients:

2 (1 oz.) boxes pudding, any flavor works, and sugar free can be used.

4 cups cold 2% milk

1 individual package of graham crackers (usually 3 in a box, so need only 1)

1 (8 oz.) tub whipped topping, lite or sugar free can be used.

Fresh fruit: 2 bananas cut into ¼ inch slices, quart box of berries, apple slices, or any type of           

                     fruit that goes with the pudding flavor being used.


Preparation:

In a medium sized bowl, beat together pudding and cold milk, for two minutes; set aside to firm up.

In a small bowl, crush the graham crackers, but small bits can be left; does not have to be a fine texture (see Option). 

To layer the trifle, a 2-quart deep bowl or container is required. 

First layer: Spread half the crushed graham crackers.

Second layer: Spread out 1/3 pudding over graham crackers

Third layer: Spread out half of the fruit.

Fourth layer: Fold together remaining pudding with 1/3 whipped topping; spread out in bowl.

Fifth layer: Spread out remaining graham crackers.

Sixth layer: Spread out remaining whipped topping.

Seventh layer: Spread out remaining fruit.


Layered View

Place lid or plastic wrap over bowl or container.  Place in refrigerator for one hour to allow all layers to settle and set.

Makes 8 servings.

Option: If some of the graham crackers are very fine, set aside, two tablespoons, before beginning the layers.  Sprinkle over the top before placing in the refrigerator.


While out, enjoying the color change of the leaves, why not have a fall themed picnic, and do not forget to bring the trifle for dessert.

Mary Cokenour


Wednesday, June 28, 2023

Sweet Rice is Not All About Pudding.

Let’s play one of those “name this” games.  Name a dessert made with rice.  Bet your answer would immediately be “rice pudding”.  Most folks would also consider this dessert’s origin to be either the United Kingdom, or America itself.  That would make you lose points in my game, as we will be going back to Asian culture instead.  Actually, way back to the Western Zhou Dynasty, of 1047 BCE, China. This country is known to be the first cultivator of rice, and rice pudding is called “eight treasure”, or” eight jeweled”, rice porridge.

Sweet rice, aka sticky rice, is more glutinous than your average, every day white rice.  It can be compacted more tightly around a sweet or savory filling, and served as appetizers, side dishes or desserts.  A one cup serving contains 37 grams of carbs which is about 2 and ½ servings; very little protein and fiber.  So why is it eaten, on a daily basis, in many countries, not just Asian cultures?  Sticky rice has antioxidant properties that help lower oxidative stress, and is rich in minerals like zinc, magnesium, copper, phosphorus and selenium.  Health benefits include increased bone density, decreased inflammation, and improved heart health.  The con side of all this is, what the rice is eaten with of course.  If you make a large batch of deep-fried rice balls that contain a mixture of chocolate and caramel, then eat the entire batch.  Oh boy, are you going to get yourself seriously sick, and just might end up in the hospital.  In other words, no matter how healthy something is, still have to keep in mind that annoying little word, moderation.

Is all sweet rice the same, no matter what country it is grown in?  Surprisingly not.  Here in Monticello, we have Ja-roen Thai Restaurant (thankfully still open, and everyone wishes the sushi would be brought back…but I digress).  In Moab, there are several Thai restaurants that are of high quality as well.  One dessert that is typically on menus is Mango with Coconut Sticky Rice (Khao Niao Mamuang).  The rice used is whiter, less opaque and longer than that used in Japanese restaurants.  After the rice is prepared, it is combined with full-fat, sweetened coconut milk, and left to rest to soak up the milk.


So, it is no surprise that Roy and I are super fans of Asian cuisines, and he benefits from all my attempts at creating many of our favorite dishes.  Lately, I have been on a mochi kick.  Say what?  Mochi which is made from a Japanese grown short grain, opaque form of sweet rice.  The traditional method of making the mochi paste is to steam the rice, then pound it out inside a wooden bowl with a wooden mallet.  The paste is then formed into balls that can be eaten as is, or the paste is formed around sweet or savory fillings.  Nowadays, the flour can be purchased, water and sweetener added, and the paste simply stirred up in a bowl.  For those truly interested, you can learn, in six easy steps, to make your own homemade mochi, with your purchased flour, at: https://www.instructables.com/How-to-Make-Homemade-Mochi/


Purchasing premade mochi, online, is available, shipped in from Japan, and most vendors have reasonable prices.  The products may have a filling, or you can purchase just the simple mochi balls that resemble mini-marshmallows covered in powdered sugar.  But wait, if you happen to be in Monticelli, stop in at Blue Mountain Foods, go to the ice cream section and you can purchase “My Mochi”; mochi wrapped around frozen balls of rich and delicious ice cream (my favorite flavors are green tea and double chocolate).  Remember though, these little goodies are high in carbs, so one is a perfect serving.  Roy and I, though, had a fun time taste testing all the products we could find; in moderation of course (wink, wink).

What does mochi taste like?  Similar to a marshmallow, but not as sweet, and the texture is similar, but gooier.  Oh dear, now another warning that sort of ruins some of the fun of eating mochi.  Do not put an entire mochi in the mouth and attempt to eat it whole.  Mochi must be eaten in small bites and thoroughly chewed before swallowing.  Due to its glutinous makeup and dense, thick, sticky texture, it can cause a choking hazard.  If not chewed, but simply swallowed, the sticky mochi gets stuck in the throat, and can lead to suffocation. 

Please do not be turned off by this warning, since common sense dictates that anything eaten must be in manageable bites anyway, but can still cause a choking hazard. 

Roy and I dream about traveling to the various Asian countries someday, but until then, we can enjoy the cuisines, either in a restaurant, or making it at home.  Try it, you just might surprise yourself, and truly like it!

Mary Cokenour