Showing posts with label tomatoes. Show all posts

Wednesday, December 10, 2025

Good Fortune and Feasting for Winter Solstice.

“The boar's head in hand bring I, 

Bedeck'd with bays and rosemary.

And I pray you, my masters, be merry.   

As many as are at the feast.”

~The Boar’s Head Carol”, 15th century British Christmas carol~

Calendar wise, we are still, technically in the season of autumn.  Outside though, there is snow on the mountains; occasional hail, rain or sleet falls (hey, Mother Nature has multiple personality disorder, just go with the flow of it), and temperatures cold enough to freeze a runny nose.  In other words, the weather is screaming, “Winter!!!”.

For 2025, the Pagan holiday of Yule, or what the common majority call Winter Solstice, will be on December 21st.  This is the shortest day of the year which means the fewest hours of daylight and the longest night when the northern hemisphere is tilted farthest from the sun.  As the days progress, more daylight will begin to show until the longest day of the year in June, or summer solstice.  Winter is a time for the earth to fall into deep slumber and regain energy throughout its time of sleep, and our ancient ancestors showed thankfulness with celebration.

Foods served during the feasting (dependent on regional location and timeline era) consisted of hearty, preserved, and spiced ingredients that symbolized warmth, and full larders for the harsh winter months.

Savory Main Dishes

Meats: Roasted pork (wild boar or pigs) ham, goose, beef, smoked fish, and sauce meatballs.

Sides: Root vegetables (potatoes, squash, carrots), stuffing, hearty breads, and pickled items.

Soups: Remnant soups made with leftover meats and vegetables.

Sweets & Baked Goods

Cakes & Breads: Yule log cake, gingerbread (Lebkuchen), fruitcake, spiced cookies (caraway, shortbread), saffron buns, and rich fruit breads.

Puddings & Pies: Figgy pudding, mince pies, and pumpkin pie.

Candies: Fudge, peanut brittle, peppermint bark, and chocolate truffles.

Drinks

Spiced Ales/Wines: Mulled wine, wassail (Lamb's Wool with ale, apples, spices), and spiced mead (honey wine).

Hot Drinks: Hot chocolate, hot buttered rum, and ginger tea.

Other: Eggnog, cider, and homemade fruit-infused spirits like Sloe Gin.

Fruits & Nuts

Citrus: Oranges and lemons.

Other Fruits: Apples, pears, cranberries, and dried fruits (figs, raisins).

Nuts: Hazelnuts, walnuts, pecans, often added into baked goods.

Which now brings me back to the Boar’s Head Carol that began this article.  Pork, namely wild boar and pigs, were an essential celebration meat, going back eons.  Pagan feasts sacrificed wild boars, and the roasted meat was then eaten to ensure good fortune and feasting during winter.  Ah, but what about God forbidding the consumption of pork by the Hebrews?  God forbade pork in the Old Testament (Leviticus, Deuteronomy) to set Israelites apart from pagan nations (all ancient cultures that worshipped Polytheism, or the worship of multiple gods).  This prohibition was a mark of holiness, cultural identity, and separation from the worship of false idols.

As Christianity emerged, many pagan beliefs, traditions and celebrations were incorporated to make an easier transition into this new religion.  So, the eating of pork became a popular tradition for Christmas, and even a traditional welcome for the New Year. The boar's head was the centerpiece at medieval Christmas feasts, symbolizing triumph over evil, presented with great ceremony with an apple in its mouth, and accompanied by the singing of the famous "Boar's Head Carol".  As wild boar began to become scarce, pigs specially bred to immense sizes, became the perfect substitute.

…and now for a pork recipe that would please the pagan souls of our ancient ancestors.  No!  Not how to roast and serve a pig’s head; had you scared there for a second, right?


Pork Chops in Barbecue Sauce


Ingredients:

 3 Tbsp. olive oil

2 tsp. salt

1 tsp. ground black pepper

8 boneless pork chops trimmed of all fat

2 large onions, julienned

4 tomatoes, seeded and chopped

1 bottle (18.5 oz.) Sweet Baby Ray’s Sweet & Spicy Barbecue Sauce

Preparation:

In a large 12-inch skillet, heat oil on medium-high heat.  Mix salt and pepper together and sprinkle over one side of pork chops.  Place chops in skillet, seasoned side down; sear for one-minute, flip chops and sear other side for one-minute.


Spread onions, then tomatoes over pork chops; pour barbecue sauce over all.  Let cook for 10 minutes, moving the ingredients around slightly to let the barbecue sauce seep downwards to the chops.  Reduce heat to low, cover and let cook for another 10 minutes.


Serve with sides of potato and vegetable; however, number of servings is dependent on size of chops.

For us, I added a side of mashed potatoes loaded with Vermont white cheddar, and I tend to use yellow (golden) potatoes as they are buttery in flavor, and come out ultra smooth in texture.  The vegetable was a flat or snap bean, called Romano or Italian green beans, which have a naturally sweet flavor, and firm texture to ordinary green beans.

Sleep well Earth, Sleep well Nature, and we look forward to your return in Spring.

Mary Cokenour 


Wednesday, October 22, 2025

There’s Mexican and Then Sort of Mexican.

When it comes to cooking up Mexican recipes, I often tend to wonder, “Is this authentic, or another recipe that has been Americanized?”.  Let’s get real about American food, it basically came about from other countries and cultures that immigrated to North America.  Nowadays, mainly in extremely large metropolises, purely ethnic communities can be found and you will get the real deal when it comes to their country’s cuisine.

Mexican food can be found from the smallest town to the largest city, but even restaurants have to cater to the awkward taste of the typical born and raised American.  Take, for example, fajitas; you will not be finding them served in Mexico City, Guadalajara (Gustavo’s of Monticello does have them on their menu), Oaxaca or even Tijuana.  Why?  Their origin is Texas, The Lone Star State, where cowboys from Mexico taught the American West cowboy how to eat better.  This is an example of fusion cooking, where the cuisine of Texas combined with Mexican cuisine, and a new recipe was born.  Don’t think this is true, then I’ll quote myself from November 2016, “A historical piece called “Fajitas, South Texas Style”, done at Texas A&M University by Mary K. Sweeten and Homer Recio, established that this could be traced as far back as the 1930’s in Texas; hence the beginning of what is called “Tex-Mex” cuisine.  (Go to: https://oaktrust.library.tamu.edu/bitstream/handle/1969.1/147901/Bull1500a.pdf?sequence=9&isAllowed=y for the full story.)”.  A whole study done on Tex-Mex cuisine, and fajitas; now would I lie to you?

Let’s take on another popular recipe which, again, has its origins in Tex-Mex, Taco Soup.  Alright, don’t be getting your knickers in a twist, no way will I be disillusioning tacos.  Taco soup is actually derived from a more traditional Mexican soup, Tortilla soup. It combines traditional Mexican flavors, like those found in tacos and chili, with ingredients easily available in American supermarkets, such as taco seasoning, diced tomatoes with green chilies, and a variety of beans.

In my search for a taco soup recipe worth creating, I found one in a Paula Deen cookbook; however, it ended up being the consistency of chili, and tasting exactly like that.  Doing more searching, I was amazed that most of the recipe sites that mentioned taco soup had "cooks" with Paula's recipe listed word for word; yet they listed the recipe as their own "original" recipe.   So, I have "cooks" in quotes to show my sarcasm as they aren't real cooks, just copycats who don't have the manners to give credit where credit is due. The recipe I will be giving is highly influenced by Paula Deen, but tweaked enough to be considered an original, not a copycat.  It has a creamed soup texture, not thick like a standard chili, and the ranch dressing gives a mild flavor that does not overpower the concept of tacos.


Taco Soup

Ingredients:

1 lb. ground beef (85% lean), browned, drain excess grease

1 (28 oz.) crushed tomatoes

1 (14.5 oz.) can diced tomatoes with green chilies

1(14.5 oz.) can beef broth

1 (15 oz.) can great northern (white) beans

1 (15 oz.) can whole black beans

1 (11 oz.) can Mexican style whole kernel corn

1 (1.25 oz.) packet taco seasoning mix

¼ cup bottled original ranch dressing, not buttermilk

Preparation:


Set 4-quart crock pot on low; spray with nonstick cooking spray. Put in all items from ingredients list; do not drain beans or corn. Cover and cook for 4 hours.


Makes 10 (2 cup) servings.

Garnishes:

Chopped fresh cilantro

Avocado slices

Diced red onion

Sour cream

Shredded Mexican cheese blend

Crumbled Queso Fresco cheese

Tortilla chips or strips

Now for that authentic Mexican soup I mentioned earlier, Tortilla Soup aka Sopa Azteca aka Sopa de tortilla.  The origin of tortilla soup is traced to pre-Columbian Mexico, where the use of corn tortillas in soups was a natural way to utilize leftover tortillas. The dish evolved from indigenous practices in Central Mexico, incorporating ingredients like corn, tomatoes, and chiles, and later adding European influences like onion, garlic, and chicken broth. While the exact moment of creation is unknown, the combination reflects ancient Mexican culinary traditions. Tortilla soup's foundational ingredients were staples in the diet of indigenous peoples in Mesoamerica, including the Aztecs, long before the arrival of the Spanish.  It is an iconic meal that is comforting and resourceful at the same time.

Besides chicken broth, my recipe also incorporates chicken meat, so hence the name, chicken tortilla soup. The soup is colorful from the ingredients, flavorful from the seasonings and a mild warming sensation from the chilies exemplified the essence of comfort.  The tortilla chips? I wondered about them, basically why put something crunchy in a soup, just so it can get soggy?  I was surprised though; the softened tortilla chips gave the illusion of noodles (tortilla strips) or dumplings (tortilla chips) enhancing the feeling of comfort overall.


Chicken Tortilla Soup


Ingredients:

6 boneless, skinless chicken breast halves

1 (15 oz.) can black beans, do not drain liquid

1 (15 oz.) can pinto beans, do not drain liquid

2 (11 oz.) cans Mexican corn, do not drain liquid

1 (14.5 oz.) can diced tomatoes with green chilies

1 Tbsp. dried cilantro

½ tsp. dried oregano

½ tsp. ground cumin

¼ tsp. ground black pepper

2 (14.5 oz.) cans chicken broth

Tortilla chips

Preparation:

Set a 6-quart crock pot on low; place inside the ingredients in order of listing. Cook for 6 hours; remove chicken and shred. Return chicken to crock pot and mix thoroughly. Line bottom of soup bowl with tortilla chips; ladle soup over chips.

Makes 12 servings.

Garnishes: sour cream, shredded cheese, avocado, chopped fresh cilantro

Considering the stormy weather we are currently having, a hot bowl of either of these soups will warm body and soul up quite nicely.

Mary Cokenour 


Wednesday, September 28, 2022

Be Creative with Your Second Harvest.

 As the cooling rains fall, the dust is washed away from every surface it touches.  The soil is pounded down while greedily sucking up every moist drop that it can contain.  Cold weather plants plead to live for one more month, while less resistant ones struggle to stay upright.  Yes, the season of autumn has taken the throne, and we must do its bidding.

The plants in our vegetable garden have granted us one more abundance for harvest.  The last picking of tomatoes, peppers, zucchini and yellow squash; and their mothering plants transferred to the compost bin.   Unfortunately, not enough for processing for winter storage, but enough to create salsa for this weekend’s anime marathon.  Plus, two meals popping with colors of green, red and yellow; Greek inspired vegetables, and a cheesy, vegetable loaded frittata.  I look at this as a prequel to when the leaves will be displaying their fall vibrant array.


Greek Inspired Vegetables

 Ingredients:

1 large zucchini

1 large yellow squash

1/8 cup olive oil

½ cup cherry tomatoes which were cut in half

1 tsp. crushed Greek oregano

½ tsp. ground black pepper

Feta cheese, crumbled

Preparation:

Preheat oven to 350F; line a baking sheet with aluminum foil.

Slice the zucchini and yellow squash diagonally, place on top of foil, in single layers.  Drizzle oil over slice, and bake for 20 minutes.

Remove vegetables to serving platter, top with tomatoes, and sprinkle with oregano and black pepper.  Sprinkle with crumbled Feta cheese, to taste (we like plenty of it!).

This can be served as a meal, serving two; or as a side dish

The next recipe is for a cheesy, veggie loaded frittata.  What is frittata? Frittata is an egg dish similar to an omelet or a crustless quiche.  It can contain ingredients such as meats, cheeses, vegetables or pasta, and can be flavored with herbs and/or spices.  A frittata can be baked, but is mainly made in a skillet. When started on a stove top the frittata can be finished off in an oven, under a broiler, or flipped and finished in the pan.  The flipping technique can be daunting, especially if attempting the “up in the air” flip.  The easiest way is to slide the frittata onto a large plate, place another plate over top, flip, and then slide back into the skillet.  Or place the skillet over the plate, and then flip it over, altogether.  Of course, with the second option, you have to be very careful doing it, as the skillet will be burning hot; oh, and remove the plate before finishing the cooking process.

Frittata preparation differs from omelet preparation in that the eggs are beaten with water, milk or cream to incorporate more air, where the eggs for omelets are less airy. The additional air in the frittata mixture allows for a deeper filling and a fluffier result. Additional ingredients are added to the pan after the egg mixture, and before the eggs are fully cooked.

A frittata is usually divided into slices, and while it can be served as a meal by itself, a salad, or other side dish, can be added.


Cheesy, Vegetable Loaded Frittata

Ingredients:

6 eggs

3 Tbsp half n’ half

3 Tbsp. butter

½ cup each julienned red bell pepper, green bell pepper; thinly sliced zucchini, and peeled, thinly sliced yellow squash

3/4 cup shredded sharp cheddar cheese

1 tsp. fresh, minced tarragon (used crushed, dried if fresh not available)

¼ tsp. salt

1/8 tsp. ground black pepper

Preparation:

In small bowl, whisk together eggs and half n’ half; set aside.

In a 10-inch, non-stick, skillet, on medium heat, melt butter and sauté all vegetables together, about 5 minutes; remove to bowl.   In same skillet, pour in egg mixture and let eggs cook for 5 minutes; do not stir. Distribute the vegetables, cheese, tarragon, salt and pepper evenly throughout the partially cooked eggs; let cook another 5 minutes.

Slide the frittata onto a plate, cover with another plate and flip over; slide it back into the skillet and let cook another 5 minutes. Slide frittata onto clean serving platter, cut into wedges, either 4 or 6, to serve.

 Makes 4-6 servings.

 Mary Cokenour

Wednesday, February 9, 2022

Remembering Childhood Comforts.

Happy childhood memories are few for me and they almost all seem to revolve around food in some way. No wonder really, as food is comforting in itself. It fools you into believing that all is right with the world, well for that moment at least; and later on, if need be, the memory of it can soothe an unpleasant moment in time. 

Take, for example, a thunderstorm brewing and suddenly taken back to a childhood memory. During such storms, I would put four chairs in a square formation, throw a large blanket over them and pretend to be camping outdoors. Some of you probably did the same thing, but called it “playing fort”.  I would have my favorite stuffed animals as company, a flashlight to light the interior, books to read and a large bowl of one of my grandmother's home cooked meals. It could be spaghetti and meatballs, shrimps in sauce over spaghetti, or one of her many delicious soups. Whatever it was, it was wonderful and I would always sneak out of my tent (between thunderclaps) to get a second bowl.

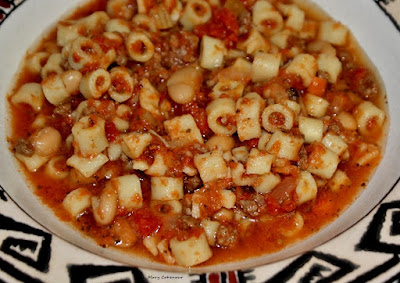
My grandmother's cooking was able to provide me with, not just comforting moments, but comforting memories to help me later on. One such dish was her Paste E Fagioli; a wonderful dish of beans, meat and pasta in a flavorful broth. The steam rising up from the bowl, so fantasy figures could be picked out, much like one would do when watching the clouds in the sky.  Problems are set aside momentarily while the senses take in the taste, texture, smell and overall good feel of the food being consumed.  Oh, the problems are still there, but now a calm has been reached.  The mind and body, instead of knee-jerk reacting, can deal in a more orderly manner; or that is what we hope for.

While Pasta e Fagioli (meaning pasta and beans) is a typically Italian soup, recipes can be found as far as the Alps, and stretching all through the Mediterranean.   Originally, the scarcity of meat made this a vegetarian meal with the starchiness of the beans, maybe potatoes too, giving a thicker consistency.  As cattle, pigs and sheep became more plentiful, additions of these meats elevated the quality of the soup.  Think of this recipe as an example of the story, “Stone Soup”; whatever is at hand can be placed in the pot, all combining for a delicious meal.  My grandmother made this soup in a large stock pot on the stovetop, but I have converted it for cooking in a crock pot.  The stovetop method took hours; stirring and checking to make sure nothing stuck to the bottom and burned.  The crock pot method still takes long hours of cooking, but “setting and forgetting” is less stressful.


 Pasta E Fagioli

 Ingredients:

2 lbs. lean ground beef

1 large onion, diced

3 medium carrots, peeled and diced

4 celery stalks, diced

1 (14 ½ oz.) can diced tomatoes

1 (15 oz.) can tomato puree

1 (28 oz.) can crushed tomatoes

2 (16 oz.) cans white kidney beans (Great Northern), drained and rinsed

1 qts beef stock

3 tsp oregano

2 tsp ground black pepper

4 Tbsp. dried parsley

¼ tsp cayenne pepper flakes

8 oz. ditilini pasta, cooked before adding to the crock pot

Preparation:

In large skillet, brown meat till no pink shows; drain grease.

Spray 6-quart crock pot with non-stick spray. Mix together meat and all ingredients, except the pasta. Set on low heat and cook for 7 hours; add in pasta and cook another 15 minutes before serving. If desired, grated Parmesan cheese can be sprinkled on top of each serving.

Makes 12 - 14 servings.

Mary Cokenour

Wednesday, September 30, 2020

Red Tomato Harvest.

September 22, 2020; the first day of autumn, the beginning of Mabon and celebration of the fall season.  Mabon is the Second Harvest; a reflection of the past, gratitude for the present, blessings for the future.  A week-long celebration in which the bounties of fruits, vegetables and grains are harvested for the final time.  Pickling, jamming, jellies, bread making, dehydrating, roasting, and food preservation are the major goals.  Winter, depending upon where one lives, can be knocking at the door at any moment.

In my previous article, we visited the taste treat of Fried Green Tomatoes.  I bet many of the home cooks tried it, but I bet many others pickled those green tomatoes for future use.  Since this is time for Second Harvest, consider this a second article to figure out what to do with all those extra red tomatoes.  While they can be canned or frozen whole, homemade pasta sauce and salsa are very much delicious options.   However, two other options are dehydrating and roasting. 

Dehydration is extracting all moisture from a thinly sliced food item, then sealing it in air tight packaging.  It can be seasoned before processing, but be careful as anything added will be greatly intensified in flavor.  Jerky?  Yes, this is made through the dehydration process, as is “fruit leather”.  Owning a dehydrator makes the process easier, less messy, more hygienic, but still time consuming.  Cutting the ripe, red tomatoes into one quarter inch slices, space them out on the dehydrator disks.  Cover, turn on the device and my three trays still took eight hours to completion.  If all five trays had been used, the time would have been ten to twelve hours.  Once completely dried, carefully lift the slices which have shrunk to 1/8th of an inch thin.  I placed mine in a resealable plastic bag, making sure to, carefully, squeeze out the air, before sealing.  Yes, a container can be used, but it is air that will destroy all your hard work by creating mold on the tomato slices.  Keep them in a cool, dry, dark environment; heat and light are not friends to dried foods.  In a cabinet, they will keep for six months; stored in a freezer is a one year bounty!

Freshly sliced tomatoes in dehydrator.

Dried tomato slices.

Dehydrated Tomatoes

The other method for drying out tomatoes is to Sun Dry.  The tomatoes are sliced, placed on parchment lined trays and exposed to the sun until completely dried out.  This method takes days, leaves the tomatoes open to the air, and anything air borne.  While, in Utah, the red dust of our magnificent sandstone formations is nicknamed “seasoning”, do we really want it on our drying tomatoes?  Then there are insects, falling leaves, pet hair, and who knows what other non-tasty and unhealthy yuck that might get added in.  So, as you can guess, I am partial to a dehydrator.

What can dehydrated tomatoes be used for?  First, they can easily be rehydrated by soaking in hot water for thirty minutes.  Chop them up to add to salads, slices onto sandwiches, or anything else tomatoes are called for.  They can, also, simply be crushed or ground up to be added to soups, stews, dressings, and basically any dish calling for seasoning.  Dried tomatoes have intensified tomato flavor, so add a sweet/tart/tangy balance to a recipe.

Roasted tomatoes will not keep as long as dried.  Up to five days in the refrigerator, only six months if frozen.  Reason being is the cooked olive oil which can eventually turn rancid, even if frozen.  However, these little tidbits are so exquisitely delicious, they will not last long anyway!

Preheating the oven to 450F, slice the tomatoes, again, to one quarter inch thickness.  If using cherry tomatoes, simply cut in half.  In a large bowl, mix the tomatoes with a half cup of olive oil  (this is for 6-8 large Roma tomatoes), one quarter cup of Italian herbal mix, one tablespoon garlic powder, 1 teaspoon ground black pepper, one half teaspoon of fine sea salt. 


Place the tomato slices, or halves, in rows, onto jelly roll pans (the sides will keep the oil from leaking onto the oven floor).  Roast for 20-25 minutes in the oven; any longer and they will begin to turn too mushy.  Let cool for 15 minutes before placing in air tight containers or bags.


Roasted Tomatoes

You will be tasting them, I know you cannot resist!  Have any frozen pizza in the freezer?  Unwrap, place a few slices of the roasted tomatoes on it, and then rewrap.  Wait until you finally bake that pizza, the taste will make your eyes pop out!


How about some Bruschetta?  While the tomatoes are roasting, brush thick slices of Italian or French bread (even sub rolls will work) lightly with olive oil.  Once the tomatoes are done, space them out on the bread, top with shredded mozzarella and pop back into that 450F oven for 15-18 minutes.  One bite, and you will be totally in love!


Bruschetta and Roasted Tomatoes

Joyous Mabon, Welcome Autumn, Second Harvest is here, Celebrate and eat some tomatoes!

Mary Cokenour

Wednesday, September 23, 2020

The Journey of Fried Green Tomatoes.

Like a lot of women, I happen to enjoy the occasional “chick flick”, and one such movie is Fried Green Tomatoes.    It came out in 1991, based on a novel by Fannie Flagg, about the women at the Whistle Stop Café.   Starring Mary Louise Parker, Mary Stuart Masterson, Kathy Bates and Jessica Tandy, this is feel-good story of female friendship and empowerment in Alabama.  This is also the first time many Americans heard of “fried green tomatoes”, and it was assumed the recipe originated in the Southern United States.

Actually, fried green tomatoes was not a dish served, in the South, before 1991, but were well known in the Northeast and Midwest.  According to Robert F. Moss, a food historian and writer in South Carolina, "they entered the American culinary scene in the Northeast and Midwest, perhaps with a link to Jewish immigrants, and from there moved onto the menu of the home-economics school of cooking teachers who flourished in the United States in the early-to-mid 20th century."  (https://alforno.blogspot.com/2007/08/fried-green-tomato-swindle.html)

While Moss found recipes in several Jewish and Midwestern cookbooks of the late 19th and early 20th centuries, there were none in Southern cookbooks or newspapers.  Due to the movie, the origin of fried green tomatoes became lost, and re-designated to a whole new region of the United States.  See, a good example why history should not be messed with!

A recipe for "Fried Green Tomatoes" appears in the International Jewish Cookbook (1919), recommended as "an excellent breakfast dish," (Of course I have a copy, did you really have to ask?)   The recipe also appears in Aunt Babette's Cookbook (1889), another kosher Jewish recipe book. Recipes for "fried tomatoes" (though not necessarily green ones) appear in several Midwestern cookbooks from the late 19th Century, including the Buckeye Cookbook (1877) and The Presbyterian Cookbook (1873) from the First Presbyterian Church of Dayton, OH.  (Ok, no, I do not have any of these others named.)

Basically, we have fried green tomatoes beginning the journey in the Northeast, primarily New York.  It then begins traveling towards the Midwest, but only ends up in the Southern states due to a movie.   Which now ties into Good Things to Eat – From Old Nauvoo -, and a copy of this little cookbook can be obtained at the Restoration Bookstore (https://restorationbookstore.org/collections/cookbooks/products/90209000).   What does this recipe journey tie into, you wonder?  For those not entirely familiar with the Mormon religion, Mormonism originated in the 1820s, in western New York, during a reform period known as the Second Great Awakening.

Most of the population were none too happy with this new religion (so much for reform), so the members moved towards the Midwest. Settling in Kirtland, Ohio, there was hope to establish a permanent New Jerusalem, or City of Zion, in Jackson County, Missouri. However, they were pushed out of Jackson County in 1833 and forced to settle in other parts of Missouri in 1838.

What has this all to do with the Temple at Nauvoo, and a cookbook?  The Church's first temple was in Kirtland, Ohio, in 1836, and the only one completed in the lifetime of Joseph Smith. Another Temple was built in Nauvoo, Illinois, but in the winter of 1846, the Mormons were forced out once again.  This Temple received a double insult, in 1848, by being damaged by fire, and a tornado, before finally being demolished.

Now what I really want you all to see, is the correlation of the traveling of Jewish immigrants, from New York, to the Midwest; and the Mormon journey.  Was there perhaps interaction going on, a sharing between two separately distinct religions?  Maybe not in religious doctrines, but when it comes to cooking and recipes, you know all the ladies were sharing and comparing!  So, there is no wonder that a Jewish culinary recipe would find its way into a cookbook, related to Nauvoo.

On page 62, appears "Fried Tomatoes", and the batter for this recipe is versatile.  It is thin enough to make crepes (take out the black pepper if not desired), or add more flour for deliciously, fluffy pancakes.  Oh, and there is also a recipe for "Summer Squash Pancakes" on the same page; and here is a great lead in to harvesting. 

So many tomatoes, so little time to get them red enough to create sauce or salsa.  There they sit, all those green tomatoes, on the window sill.  Hoping daily that the sun will ripen them up quickly.  I have the patience, I can wait, but...but...what do those green tomatoes taste like.  They are firm (almost hard), moist, but not juicy, and sour (pucker up!).  No one wants to eat that, well, except those who love sour.  Now is the time to make yourself, your family, even friends, a real taste treat, Fried Green Tomatoes.  In the Nauvoo recipe, sugar is added to combat the sour of the green tomato.  However, we enjoy dipping our slices into a mildly spiced Ranch dressing which enhances, not only the tomato, but the fried batter around it.   For added crunch, after putting the batter on the tomato slices, press Panko (Japanese bread crumbs) on, before frying up.

Now this recipe seems to be for firm red tomatoes, but I have personally found them to still be too juicy for a good fry-up.  …and the way I am constantly making sauce, there are hardly ever enough around to be fried up anyway.


 Fried Tomatoes

(Good Things to Eat – From Old Nauvoo – page 62)


Ingredients:

6-8 tomatoes  

1 cup milk

1 cup flour

½ tsp. salt

1 tsp. sugar

¼ tsp. pepper

2 eggs, beaten

1 Tbsp. butter


Preparation:

Wash tomatoes and cut them into ½ inch slices.  Melt butter slowly in a skillet. 


Mix other ingredients together.
  Dip the tomatoes in the batter, covering both sides.  Sauté’ 2 or 3 minutes on each side, or until golden brown. 


You may also use green tomatoes (Yes, do this!!!).  Add extra sugar (No, you don’t have to!)

Even food has its own historical background, and I do hope you enjoyed this culinary journey.

Mary Cokenour


Wednesday, October 9, 2019

The Pizza Trilogy - Sicilian Pizza


In a pizzeria far, far away from Utah, square pieces of pizza are being devoured; and I am full of envy and want.  This is the second installment of pizza making - Sicilian Pizza, also known as The Square.  For those of you who happen to travel to the New York City area, go into one of those older, authentic Italian pizzerias and make sure you order correctly.  If you want to try a slice of the Neapolitan, or round pie, you say you want “a slice”.  If you want to try Sicilian, you want “a square”.  If you just say you want a “piece of pizza”, you will be asked, “Youwana slice or a square?”   Capisce?  (pronounced cah-PEESHis - an Italian word that is used in American slang to say "got it" or "understand."?)  Now you are thoroughly prepared to order.


What exactly is Sicilian Pizza?  This type of pizza originated in the Palermo region of Sicily.  This is a thicker dough than used in the round type of pizza (Napolitano (for Naples)) and baked in a heavy aluminum rectangular pan.  In the United States, it is mainly seen in New York and New Jersey pizzerias, and whether the cheese goes under the sauce or on top is dependent on each individual pizza maker.

 “Tomato Pie” is a Sicilian pizza that has a thick layer of sauce over the cheese and is topped with a layer of diced or thinly sliced Roma tomatoes.   Why eat something so loaded with tomatoes?  Tomatoes have a wealth of vitamin and mineral content: Calcium, Potassium, Phosphorus, Vitamin C, Vitamin K1, Folate (Vitamin B9), Lycopene, Beta Carotene, Naringenin and Cholorgenic Acid  The last four are Antioxidants which have been found to be necessary for good heart, skin and joint health.

Enough with the lecturing, let’s get to making Sicilian and Tomato Pies.  Since the “crust” is very thick, like a nicely baked bread, I will also tell you how to make French Bread Pizza.  Now you can make it fresh at home, and not have to buy that frozen product at the store.


Sicilian Pizza

How to Make the Dough
Ingredients:

2 (.25 oz.) packages of active dry yeast
4 cups flour
½ cup warm water (about 110F)
1 tsp. salt
1 cup cool water
2 Tbsp. olive oil


Preparation:

In a small bowl, combine the yeast with a ½ cup of flour and the warm water; cover with plastic wrap and allow proofing for 15 minutes; stir afterwards to deflate.

In a large bowl, combine remaining flour, salt, cool water and yeast mixture.  Turn the dough out onto a floured board and knead for 15 minutes.   Clean the large bowl, lightly dust with flour and return dough to it; cover with plastic wrap and let rise for 1 ½ hours.

Preheat oven to 450F.  Brush the bottom and sides of a 17 ½” x 11 ½” x ¾” heavy aluminum baking pan.  Punch down the dough, return to floured board and roll out slightly.  Place dough into pan and stretch out to all sides, leaving a lip all around.  Let it rest for 15 minutes before adding toppings*.

Bake for 30 minutes or until crust is golden brown.
Makes 12 servings.

*Note: toppings would normally be a layer of sliced mozzarella cheese and an evenly spread layer of sauce; other toppings such as meats and/or vegetables can then be placed over the sauce.


Tomato Pie
Ingredients:

12 slices thinly sliced mozzarella cheese
2 cups homemade pizza sauce
2 cups diced or thinly sliced Roma tomatoes
1/3 cup grated cheese

Preparation:

Lay out the slices of cheese onto the pizza dough; evenly spread out the sauce and then the tomatoes.

Bake for 30 minutes or until crust is golden brown.  Remove pie from oven and sprinkle grated cheese over top of pizza.
Makes 12 servings.


Now I could have made this Pizza Trilogy into a quad, but why drag out a good thing, right?

French Bread Pizza can be found easily in the pizza section of the frozen food aisle; but making it from scratch is just as easy.  Honestly though, would you not rather make it yourself?  The frozen product has preservatives, oven needs preheating, let it bake for 20 minutes and it is sometimes an unsatisfactory product.   Monticello’s food market, Blue Mountain Foods, sells loaves of, what they label French bread, but looks like a very soft version of Italian bread.  I like to use it when in the mood for pizza, do not have the dough handy, but want it now!   When it comes to spontaneous cravings for pizza, sometimes you truly have to get creative.

How to Make French Bread Pizza


Basically there are three main ingredients: loaf of the wide French bread, a block of mozzarella cheese and pizza sauce. Cut the loaf in half lengthwise to create two half loaves; then cut these in half through the width.  If you want a rectangular look, cut off the heels first; save them to grind up and make bread crumbs.   Place the four pieces of bread, crust side down, on a large jelly roll pan.

Spoon sauce over the interior side of the bread; I use about 1/3 of a cup, but like a lot of sauce on my pizza.  While homemade sauce is best, use what you have handy.  Like I said before, sometimes when it comes to cravings, you have to be creative.   Now cut slices of the mozzarella, about 1/8" thick and lie them side by side until the bread is covered.  I find the sliced cheese melts better and creates gooey texture on the bread. 

Bake in a preheated 425F oven, center rack, for about 12-15 minutes.  Cut into thirds for easier picking up and eating, or just go for broke!  This will make four French bread pizzas.

Of course you can add other ingredients - meats, veggies, whatever you like, but make sure the meats are cooked thoroughly before using.  Also, mix the meats and/or veggies with shredded mozzarella cheese instead; that way the cheese will melt all around the pieces.

Whether you are making this for yourself, other adults and/or children; have fun with it!


Mary Cokenour

Monday, November 6, 2017

A Bite of Winter, Squash That Is.

Even though Monticello technically has four distinct seasons, sometimes Mother Nature plays tricks on the environment.  2017 saw a very short spring, weather wise, and the summer monsoon season continued further along than usual.  Fall had only just begun when on October 9th, the townsfolk awoke to the first snowfall; furnaces pulsed to life while the air filled with the scent from wood burning stoves.  As suddenly as winter touched the town, fall was back with mildly cool temperatures and the turning of leaves to warm, golden colors. 

In the kitchen, recipe pages turned to comforting soups and casseroles; holidays just around the calendar corner tickled the sweet tooth for cookies, pies and cakes.  Fall and winter is also when we tend to hibernate; cocooning ourselves inside with mugs of spiced apple cider or hot chocolate.  We become more sedentary, so shouldn’t be surprised when the pounds begin moving the needle on scales upward.  Pasta is the winter downfall of the Cokenour household; thick lasagna layered with meat sauce and cheeses; puffy ravioli loaded with creamy cheese, and maybe I’ll sneak in some chopped spinach into the cheese mixture.  Therein lies the key, getting vegetables into the meals to offset some of those pounds trying to sneak onto the hips.

Spaghetti squash is an oblong shaped (normally yellow in color, sometimes with an orange tint) winter squash which can be easily prepared.  After cutting the squash lengthwise, use a simple spoon to scoop out the seeds; the raw flesh is firm and the surprise comes after cooking.  This type of squash can be baked, boiled, microwaved or steamed; my personal favorite way is baking it in an oven.  I have tried the microwave way, but I believe the baking method gives the squash more flavor, especially if you allow the ends to brown slightly.  A medium sized squash is about seven inches long and gives up about four cups of cooked flesh.  Oh, when buying a spaghetti squash, be warned that it looks slightly like a honeydew melon, but the melon typically has a greenish tint to it, while the squash won't.


After cleaning the squash, preheat the oven to 375F; line a baking sheet with aluminum foil and place the squash cut side down.  Some folks say to rub oil on the rind, but it really doesn't do a thing for the flesh inside and the rind will soften with or without the oil.  Bake the squash for 40 - 50 minutes; the edges will begin to brown and the flesh can easily be removed with a fork.  Clean the squash while it is still hot; hold the rind side with a folded towel and lean the bottom against the edge of your bowl; with a downward scraping motion pull the strands of the flesh into the bowl.  See how it looks like spaghetti, and the texture is almost the same also; the taste however is different, it does taste like a vegetable.  You can easily use the strands in any dish you would use the pasta in; top with your favorite pasta sauce, make a frittata, or go completely vegetarian with your recipe.  Could you add a protein?  Why not!?!  Small meatballs, grilled and sliced sausages, crispy bacon; treat it like a pasta that just happens to have more vitamins and minerals than whole grains.


 Mediterranean Spaghetti Squash

 
Ingredients:

4 Tbsp. olive oil
1 and 1/2 cups sliced mushrooms
1 and 1/2 cups cup sliced zucchini
1 Tbsp. minced garlic
1 and 1/2 cups diced tomatoes
3/4 chopped fresh parsley
4 cups cooked spaghetti squash
Salt and ground black pepper to taste
Option: grated Parmesan cheese on top


Preparation:

Heat the olive oil in a large skillet over medium-high heat; sauté' the mushrooms, zucchini and garlic together until the mushrooms soften and begin to brown.  Keep stirring to keep the garlic from burning.


Add the tomatoes, mix and let them cook down for about five minutes, so the excess liquid can evaporate.


Add the parsley, but only cook for one minute to allow it to wilt a little.  If you want it to look more dramatic though, instead of chopping the parsley leaves; leave them whole.  Add the spaghetti squash and toss well to make sure it gets a good coating of the vegetables and parsley.  Add salt and pepper to taste; depending on how vegetarian you want this dish, you might want to sprinkle a little grated Parmesan cheese over the top of each serving.


Makes 4 servings.


I served this to both my husband and his mother; neither had ever had spaghetti squash before, nor knew what it was.  They ended up splitting the four servings up between them.  Good thing I keep a jar of peanut butter in the house; made myself a sandwich for lunch while they chowed down on the squash.  Oh well, at least I know they enjoyed it...a lot!

Mary Cokenour